> For the complete documentation index, see [llms.txt](https://docs.apono.io/llms.txt). Markdown versions of documentation pages are available by appending `.md` to page URLs; this page is available as [Markdown](https://docs.apono.io/docs/audits-and-reports/session-audit/session-audit-implementation.md).

# Session Audit Implementation

Session Audit captures privileged access session activity after the required connector, network, storage, and integration settings are configured. This article walks through the setup required to enable it.

***

### Prerequisites

<table><thead><tr><th width="248.99130249023438">Item</th><th>Description</th></tr></thead><tbody><tr><td><strong>Supported integration</strong></td><td><p>One of the following Apono integrations:</p><ul><li><strong>Kubernetes</strong>: <a href="/pages/6UcWOoy4aQyn55KgTokJ">Kubernetes</a></li><li><strong>SSH</strong>: <a href="/pages/B9fEOtA1xblzGrs0dsY4">SSH Servers</a> or <a href="/pages/lvTw2FfIgHruRR7qlJ4e">AWS EC2 SSH Servers</a></li></ul></td></tr><tr><td><strong>Apono connector</strong></td><td><p>On-prem connection serving as a bridge between the integration and Apono</p><p><strong>Required Version</strong>: 1.8.4</p><p>Learn how to update an existing <a href="/pages/cNMceTvopbZdVqebcrk5">AWS</a> or <a href="/pages/PGql18C6xhmOlcwdDh6b">Kubernetes</a> connector.</p></td></tr><tr><td><strong>Connector endpoint</strong></td><td>DNS address used to establish audited sessions through the connector proxy</td></tr><tr><td><strong>Network access</strong></td><td>Client machines must be able to resolve the connector endpoint and connect to port <strong>10021</strong> (Kubernetes) or <strong>10022</strong> (SSH).</td></tr><tr><td><strong>Kubernetes Command Line Tool (kubectl)</strong></td><td><p>(Kubernetes) <a href="https://kubernetes.io/docs/reference/kubectl/">Command-line tool</a> used for communicating with a Kubernetes cluster's control plane</p><p><br>For audited Kubernetes sessions, <strong>kubectl 1.24 or later</strong> is supported on macOS, Linux, and Windows.</p></td></tr></tbody></table>

***

### Connector configuration

The Apono connector should be configured according to your deployment type:

* Use the [**EKS**](#eks) steps for Kubernetes-based connectors
* Use the [**ECS CloudFormation**](#ecs-cloudformation) or [**ECS Terraform**](#ecs-terraform) steps for ECS-based connectors.

{% tabs %}
{% tab title="EKS" %}
Follow these steps to configure the connector:

1. Verify AWS Load Balancer Controller is installed on the EKS cluster.

{% hint style="info" %}
If it is not installed, install the [AWS Load Balancer Controller](https://docs.aws.amazon.com/eks/latest/userguide/lbc-helm.html) before continuing.
{% endhint %}

2. Obtain the EKS cluster OIDC provider.

{% code overflow="wrap" expandable="true" %}

```bash
export OIDC_PROVIDER=$(aws eks describe-cluster \
  --name <EKS_CLUSTER_NAME> \
  --query "cluster.identity.oidc.issuer" \
  --output text | sed 's#^https://##')

echo $OIDC_PROVIDER

```

{% endcode %}

3. Save the following trust policy as **apono-connector-trust-policy.json**.

{% hint style="info" %}
The connector uses IAM Roles for Service Accounts (IRSA) so its EKS pods can access AWS services through this IAM role. The following trust policy allows only the connector service account in this namespace to assume the role via OIDC.

Replace `<AWS_ACCOUNT_ID>`, `<OIDC_PROVIDER>`, and `<NAMESPACE>` before saving the file. The OIDC provider value should **not** include `https://`.
{% endhint %}

{% code overflow="wrap" %}

```json
{
  "Version": "2012-10-17",
  "Statement": [
    {
      "Effect": "Allow",
      "Principal": {
        "Federated": "arn:aws:iam::<AWS_ACCOUNT_ID>:oidc-provider/<OIDC_PROVIDER>"
      },
      "Action": "sts:AssumeRoleWithWebIdentity",
      "Condition": {
        "StringEquals": {
          "<OIDC_PROVIDER>:sub": "system:serviceaccount:<NAMESPACE>:apono-connector-service-account"
        }
      }
    }
  ]
}
```

{% endcode %}

4. Create or update the IAM role trust policy.

{% tabs %}
{% tab title="Create an IAM role" %}
{% code overflow="wrap" %}

```shellscript
aws iam create-role \
  --role-name "${CONNECTOR_ROLE_NAME}" \
  --assume-role-policy-document file://apono-connector-trust-policy.json
```

{% endcode %}
{% endtab %}

{% tab title="Update an IAM role" %}
{% code overflow="wrap" %}

```shellscript
aws iam update-assume-role-policy \
  --role-name "${CONNECTOR_ROLE_NAME}" \
  --policy-document file://apono-connector-trust-policy.json
```

{% endcode %}
{% endtab %}
{% endtabs %}

5. Confirm that the role trust policy is configured correctly.

{% code overflow="wrap" %}

```shellscript
aws iam get-role \
  --role-name "${CONNECTOR_ROLE_NAME}"
```

{% endcode %}

6. [Create and configure an S3 bucket](#create-an-s3-bucket).
7. Create and attach the [S3 write policy](#create-a-policy) to the role created or updated above.
8. Add the following configuration to your Helm values file, for example **values.yaml**. The `proxyService` block provisions a Network Load Balancer (NLB) that exposes the Apono connector on ports `10020`-`10024`.

{% hint style="success" icon="lightbulb" %}
To control which subnets are used for the NLB, set `service.beta.kubernetes.io/aws-load-balancer-subnets` to a comma-separated list of subnet IDs with no spaces (`"subnet-XXX,subnet-XXX"`).
{% endhint %}

{% code overflow="wrap" %}

```yaml
# values.yaml
apono:
  token: "${APONO_TOKEN}"
  connectorId: "${CONNECTOR_ID}"

serviceAccount:
  manageClusterRoles: true

proxyService:
  enabled: true
  type: LoadBalancer
  annotations:
    service.beta.kubernetes.io/aws-load-balancer-type: "nlb"
    service.beta.kubernetes.io/aws-load-balancer-scheme: "internal"
    service.beta.kubernetes.io/aws-load-balancer-subnets: "${SUBNET_IDS}"
```

{% endcode %}

9. Upgrade the Apono connector Helm chart to v2.0.34 with the values file.

{% code overflow="wrap" %}

```shellscript
helm upgrade --install apono-connector apono-connector \
  --repo https://apono-io.github.io/apono-helm-charts \
  --version v2.0.34 \
  -f values.yaml
```

{% endcode %}

10. Annotate the connector service account with the IAM role ARN so the connector can authenticate to S3.

{% code overflow="wrap" %}

```shellscript
kubectl annotate serviceaccount apono-connector-service-account \
-n <NAMESPACE> \
eks.amazonaws.com/role-arn=<ROLE_ARN> \
--overwrite
```

{% endcode %}

11. Verify that your VPN, security groups, and internal DNS allow developer machines to resolve and connect to the NLB DNS name on port `10021` (Kubernetes) or `10022` (SSH).

{% hint style="info" %}
The NLB is provisioned as internal by default.
{% endhint %}
{% endtab %}

{% tab title="ECS CloudFormation" %}
Choose the configuration path that matches your deployment architecture.

**Same AWS account**

Use this path when the ECS connector and Session Audit S3 bucket are in the same AWS account.

Follow these steps to configure the connector:

1. Provision a network load balancer (NLB) in front of the ECS connector on port `10021-10024`. **Apono will provide a revised CloudFormation Stack template for this step.**
2. [Create and configure an S3 bucket](#create-an-s3-bucket) in the same AWS account as the connector.
3. Create and attach the [S3 write policy](#create-a-policy) to an existing connector IAM role.
4. Verify that your VPN, security groups, and internal DNS allow developer machines to resolve and connect to the NLB DNS name on port `10021` (Kubernetes) or `10022` (SSH).

***

**Cross-account or organization-level**

Use this path when the ECS connector is used for an AWS Organization deployment, or when the Session Audit S3 bucket is in a different AWS account than the connector.

Follow these steps to configure the connector:

1. Provision a Network Load Balancer (NLB) in front of the ECS connector on port `10021-10024`. **Apono will provide a revised CloudFormation Stack template for this step.**
2. [Create and configure an S3 bucket](#create-an-s3-bucket) in the AWS account that will own the Session Audit bucket.

{% hint style="info" %}
The bucket policy grants access to connector roles that match the `aws:PrincipalTag/apono-connector-s3-access` and `aws:PrincipalOrgID` conditions.
{% endhint %}

3. Create and attach the [S3 write policy](#create-a-policy) to the existing connector IAM role.
4. Verify that your VPN, security groups, and internal DNS allow developer machines to resolve and connect to the NLB DNS name on port `10021` (Kubernetes) or `10022` (SSH).
   {% endtab %}

{% tab title="ECS Terraform" %}
Choose the configuration path that matches your deployment architecture.

**Same AWS account**

Use this path when the ECS connector and Session Audit S3 bucket are in the same AWS account.

Follow these steps to configure the connector:

1. Install a new [ECS connector with AWS permissions](/docs/aws-environment/apono-connector-for-aws/installing-a-connector-on-aws-ecs-using-terraform.md#with-permissions).
2. Update your Terraform configuration to use the NLB-enabled connector module and set the required NLB parameters.

{% hint style="info" %}
The Terraform module provisions a Network Load Balancer (NLB) for audited sessions and exposes ports `10020–10024`. Set `nlbScheme` and `nlbSubnetIds` to control NLB visibility and subnet placement.
{% endhint %}

{% code overflow="wrap" expandable="true" %}

```tf
provider "aws" {
    region = "{var.REGION}"
}

module "apono-connector" {
    source = "http://github.com/apono-io/terraform-modules//aws/connector-with-permissions-nlb/stacks/apono-connector?ref=v1.0.46"
    connectorId = "{var.CONNECTOR_ID}"
    aponoToken = "{var.APONO_TOKEN}"
    vpcId = "{var.VPC_ID}"
    subnetIds = "{var.SUBNET_IDS}"
    assignPublicIp = true
    nlbScheme = "internal"
    nlbSubnetIds = "{var.ENDPOINT_SUBNET_IDS}"
	
    tags = "{var.TAGS}"
}

```

{% endcode %}

<table><thead><tr><th width="209.2474365234375">Parameter</th><th>Description</th></tr></thead><tbody><tr><td><code>nlbScheme</code> string</td><td><p>Defines the NLB visibility</p><p>Set to internet-facing if the connector needs to be reachable from outside your VPC.</p><p><strong>Default</strong>: <code>internal</code></p></td></tr><tr><td><code>nlbSubnetIds</code> list(string)</td><td><p>Subnets to associate with the NLB</p><p>This value is required when nlbScheme is set to internet-facing.</p><p><strong>Default</strong>: <code>[]</code></p></td></tr></tbody></table>

3. [Create and configure an S3 bucket](#create-an-s3-bucket) in the same AWS account as the connector.
4. Create and attach the [S3 write policy](#create-a-policy) to an existing connector IAM role.
5. Verify that your VPN, security groups, and internal DNS allow developer machines to resolve and connect to the NLB DNS name on port `10021` (Kubernetes) or `10022` (SSH).

***

**Cross-account or organization-level**

Use this path when the ECS connector is used for an AWS Organization deployment, or when the Session Audit S3 bucket is in a different AWS account than the connector.

Follow these steps to configure the connector:

1. Install a new [ECS connector with AWS permissions](/docs/aws-environment/apono-connector-for-aws/installing-a-connector-on-aws-ecs-using-terraform.md#with-permissions).
2. Update your Terraform configuration to use the NLB-enabled connector module and set the required NLB parameters.

{% hint style="info" %}
The Terraform module provisions a Network Load Balancer (NLB) for audited sessions and exposes ports `10020–10024`. Set `nlbScheme` and `nlbSubnetIds` to control NLB visibility and subnet placement.
{% endhint %}

{% code overflow="wrap" expandable="true" %}

```tf
provider "aws" {
    region = "{var.REGION}"
}

module "apono-connector" {
    source = "http://github.com/apono-io/terraform-modules//aws/connector-with-permissions-nlb/stacks/apono-connector?ref=v1.0.46"
    connectorId = "{var.CONNECTOR_ID}"
    aponoToken = "{var.APONO_TOKEN}"
    vpcId = "{var.VPC_ID}"
    subnetIds = "{var.SUBNET_IDS}"
    assignPublicIp = true
    nlbScheme = "internal"
    nlbSubnetIds = "{var.ENDPOINT_SUBNET_IDS}"
	
    tags = "{var.TAGS}"
}

```

{% endcode %}

<table><thead><tr><th width="209.2474365234375">Parameter</th><th>Description</th></tr></thead><tbody><tr><td><code>nlbScheme</code> string</td><td><p>Defines the NLB visibility</p><p>Set to internet-facing if the connector needs to be reachable from outside your VPC.</p><p><strong>Default</strong>: <code>internal</code></p></td></tr><tr><td><code>nlbSubnetIds</code> list(string)</td><td><p>Subnets to associate with the NLB</p><p>This value is required when nlbScheme is set to internet-facing.</p><p><strong>Default</strong>: <code>[]</code></p></td></tr></tbody></table>

3. [Create and configure an S3 bucket](#create-an-s3-bucket) in the same AWS account as the connector.

{% hint style="info" %}
The bucket policy grants access to connector roles that match the `aws:PrincipalTag/apono-connector-s3-access` and `aws:PrincipalOrgID` conditions.
{% endhint %}

4. Create and attach the [S3 write policy](#create-a-policy) to an existing connector IAM role.
5. Verify that your VPN, security groups, and internal DNS allow developer machines to resolve and connect to the NLB DNS name on port `10021` (Kubernetes) or `10022` (SSH).
   {% endtab %}
   {% endtabs %}

#### Create a policy

Follow these steps:

1. Save the following S3 write policy locally as **apono-connector-s3-session-audit-policy.json**.

{% hint style="info" %}
The organization ID can be found in the CloudFormation stack.
{% endhint %}

{% code overflow="wrap" %}

```json
{
  "Version": "2012-10-17",
  "Statement": [
    {
      "Sid": "ConnectorS3ReadWrite",
      "Effect": "Allow",
      "Action": ["s3:GetObject", "s3:PutObject"],
      "Resource": "arn:aws:s3:::<BUCKET_NAME_PREFIX>*/*",
      "Condition": {
        "StringEquals": {
          "aws:PrincipalTag/apono-connector-s3-access": "true",
          "aws:PrincipalOrgID": "${PRINCIPAL_ORG_ID}"
        }
      }
    },
    {
      "Sid": "ConnectorS3ListBucket",
      "Effect": "Allow",
      "Action": "s3:ListBucket",
      "Resource": "arn:aws:s3:::<BUCKET_NAME_PREFIX>*",
      "Condition": {
        "StringEquals": {
          "aws:PrincipalTag/apono-connector-s3-access": "true",
          "aws:PrincipalOrgID": "${PRINCIPAL_ORG_ID}"
        }
      }
    }
  ]
}
```

{% endcode %}

2. Create the policy in AWS. The output will include a policy ARN that resembles: `arn:aws:iam::<AWS_ACCOUNT_ID>:policy/apono-connector-s3-session-audit-policy`.

{% code overflow="wrap" %}

```shellscript
aws iam create-policy \
  --policy-name apono-connector-s3-session-audit-policy \
  --policy-document file://apono-connector-s3-session-audit-policy.json
```

{% endcode %}

3. Copy the ARN. This will be used to attach the policy to the IAM role.
4. Attach the policy to the existing connector IAM role.

{% code overflow="wrap" expandable="true" %}

```shellscript
aws iam attach-role-policy \
  --role-name "<CONNECTOR_ROLE_NAME>" \
  --policy-arn "arn:aws:iam::<AWS_ACCOUNT_ID>:policy/apono-connector-s3-session-audit-policy"
```

{% endcode %}

5. Tag the connector IAM role so it matches the `aws:PrincipalTag/apono-connector-s3-access condition` in the S3 policy.

{% hint style="info" %}
Without this tag, the connector role can be denied S3 access, even after the policy is attached.
{% endhint %}

{% code overflow="wrap" %}

```shellscript
aws iam tag-role \
  --role-name "<CONNECTOR_ROLE_NAME>" \
  --tags "Key=apono-connector-s3-access,Value=true"
```

{% endcode %}

#### Create an S3 bucket

Follow these steps:

1. Set the bucket variables.

{% code overflow="wrap" expandable="true" %}

```shellscript
export BUCKET_NAME="<BUCKET_NAME>"
export AWS_REGION="<AWS_REGION>"
```

{% endcode %}

2. Create the region-specific S3 bucket.

{% hint style="success" icon="lightbulb" %}
To use Object Lock retention for Session Audit data, include `--object-lock-enabled-for-bucket` when creating the bucket.
{% endhint %}

{% tabs %}
{% tab title="us-east-1" %}
{% code overflow="wrap" expandable="true" %}

```shellscript
aws s3api create-bucket \
  --bucket "$BUCKET_NAME" \
  --region us-east-1
```

{% endcode %}
{% endtab %}

{% tab title="All other regions" %}
{% code overflow="wrap" expandable="true" %}

```shellscript
aws s3api create-bucket \
  --bucket "$BUCKET_NAME" \
  --region "$AWS_REGION" \
  --create-bucket-configuration LocationConstraint="$AWS_REGION"
```

{% endcode %}
{% endtab %}
{% endtabs %}

3. Block public access on the S3 bucket.

{% code overflow="wrap" expandable="true" %}

```shellscript
aws s3api put-public-access-block \
  --bucket "$BUCKET_NAME" \
  --public-access-block-configuration \
BlockPublicAcls=true,IgnorePublicAcls=true,BlockPublicPolicy=true,RestrictPublicBuckets=true
```

{% endcode %}

4. Set ownership controls to `BucketOwnerEnforced` .

{% code overflow="wrap" expandable="true" %}

```shellscript
aws s3api put-bucket-ownership-controls \
  --bucket "$BUCKET_NAME" \
  --ownership-controls '{"Rules":[{"ObjectOwnership":"BucketOwnerEnforced"}]}'
```

{% endcode %}

5. Enable default server-side encryption with SSE-S3 (`AES256`). For SSE-KMS, replace the encryption configuration with your approved customer-managed, KMS key configuration.

{% code overflow="wrap" expandable="true" %}

```shellscript
aws s3api put-bucket-encryption \
  --bucket "$BUCKET_NAME" \
  --server-side-encryption-configuration '{
    "Rules": [
      {
        "ApplyServerSideEncryptionByDefault": {
          "SSEAlgorithm": "AES256"
        }
      }
    ]
  }'

```

{% endcode %}

6. Enable versioning.

{% code overflow="wrap" expandable="true" %}

```shellscript
aws s3api put-bucket-versioning \
  --bucket "$BUCKET_NAME" \
  --versioning-configuration Status=Enabled
```

{% endcode %}

7. Tag the bucket.

{% code overflow="wrap" expandable="true" %}

```shellscript
aws s3api put-bucket-tagging \
  --bucket "$BUCKET_NAME" \
  --tagging '{
    "TagSet": [
      {"Key": "apono-connector-s3-access", "Value": "true"}
    ]
  }'
```

{% endcode %}

8. (Recommended) Configure Object Lock retention according to your organization’s audit log retention policy.

{% hint style="info" %}
This step applies only if Object Lock was enabled when the bucket was created in step **2**.

Object Lock retention helps protect session audit data from being deleted or overwritten for a defined period.
{% endhint %}

9. If the bucket and Apono connector are not in the same AWS account, or if your same-account deployment requires an explicit bucket policy, save the following bucket policy locally as **apono-session-audit-bucket-policy.json**.

{% hint style="info" %}
Same-account deployments do not always require an additional bucket policy. However, one may still be required if access is restricted by an existing bucket policy, key policy, organization guardrail, or other control.

Additionally, the organization ID can be found in the CloudFormation stack.
{% endhint %}

{% code overflow="wrap" expandable="true" %}

```json
{
  "Version": "2012-10-17",
  "Statement": [
    {
      "Sid": "AllowConnectorAccessByTag",
      "Effect": "Allow",
      "Principal": "*",
      "Action": ["s3:GetObject", "s3:PutObject"],
      "Resource": "arn:aws:s3:::<BUCKET_NAME>/*",
      "Condition": {
        "StringEquals": {
          "aws:PrincipalTag/apono-connector-s3-access": "true",
          "aws:PrincipalOrgID": "<PRINCIPAL_ORG_ID>"
        }
      }
    },
    {
      "Sid": "AllowConnectorListBucketByTag",
      "Effect": "Allow",
      "Principal": "*",
      "Action": "s3:ListBucket",
      "Resource": "arn:aws:s3:::<BUCKET_NAME>",
      "Condition": {
        "StringEquals": {
          "aws:PrincipalTag/apono-connector-s3-access": "true",
          "aws:PrincipalOrgID": "<PRINCIPAL_ORG_ID>"
        }
      }
    },
    {
      "Sid": "DenyInsecureTransport",
      "Effect": "Deny",
      "Principal": "*",
      "Action": "s3:*",
      "Resource": [
        "arn:aws:s3:::<BUCKET_NAME>",
        "arn:aws:s3:::<BUCKET_NAME>/*"
      ],
      "Condition": {
        "Bool": {
          "aws:SecureTransport": "false"
        }
      }
    }
  ]
}
```

{% endcode %}

10. Apply the bucket policy from the AWS account that owns the S3 bucket to grant the Apono connector permissions to the bucket.

{% code overflow="wrap" %}

```bash
aws s3api put-bucket-policy \
  --bucket <BUCKET_NAME> \
  --policy file://apono-session-audit-bucket-policy.json

```

{% endcode %}

11. Confirm that the bucket policy was applied.

{% code overflow="wrap" %}

```shellscript
aws s3api get-bucket-policy \
  --bucket <BUCKET_NAME>
```

{% endcode %}

:arrow\_up: Return to [EKS](#eks) or [ECS](#ecs).

***

### Enable Session Audit

You must enable Session Audit within the Apono connector and the SSH or Kubernetes integration.

Once the [connector configuration](#connector-configuration) is completed, **notify your Apono contact to enable the feature together.**

{% hint style="info" %}
After Session Audit has been enabled, you can review and download session information from the [**Session History**](/docs/audits-and-reports/session-audit/session-history.md) tab.
{% endhint %}

#### Connector enablement

<figure><img src="/files/PI27r3PT786gGqcjD14J" alt="" width="563"><figcaption><p>Edit the connector page</p></figcaption></figure>

Follow these steps to enable Session Audit for the connector:

1. On the [**Connectors**](https://app.apono.io/connectors) tab, in the row of the Apono connector associated with the integration, click **︙ > Edit**. The **Edit Connector** page appears.
2. Toggle **Audit sessions** to **ON**. The toggle will appear green when enabled.
3. Under **Session History Bucket ARN**, enter your S3 bucket ARN.
4. Enter the **Connector Endpoint**.
5. Click **Update Connector**.

#### Integration enablement

{% hint style="warning" %}
Enabling audit sessions has the following effects on resource access based on associated access flow.

***

**Self Serve**

On the first request after enablement, new parameters pointing to the connector will be set.

Existing active sessions **will not** be revoked.

***

**Automatic**

Credentials must be refreshed after enablement.

To refresh credentials, grantee access must be revoked.

Follow these steps:

1. On the [**Activity**](https://app.apono.io/activity) page, click the row of the request. The **Access request details** panel opens
2. Click **Revoke Access**. A confirmation pop-up window appears.
3. Click **Yes**.
   {% endhint %}

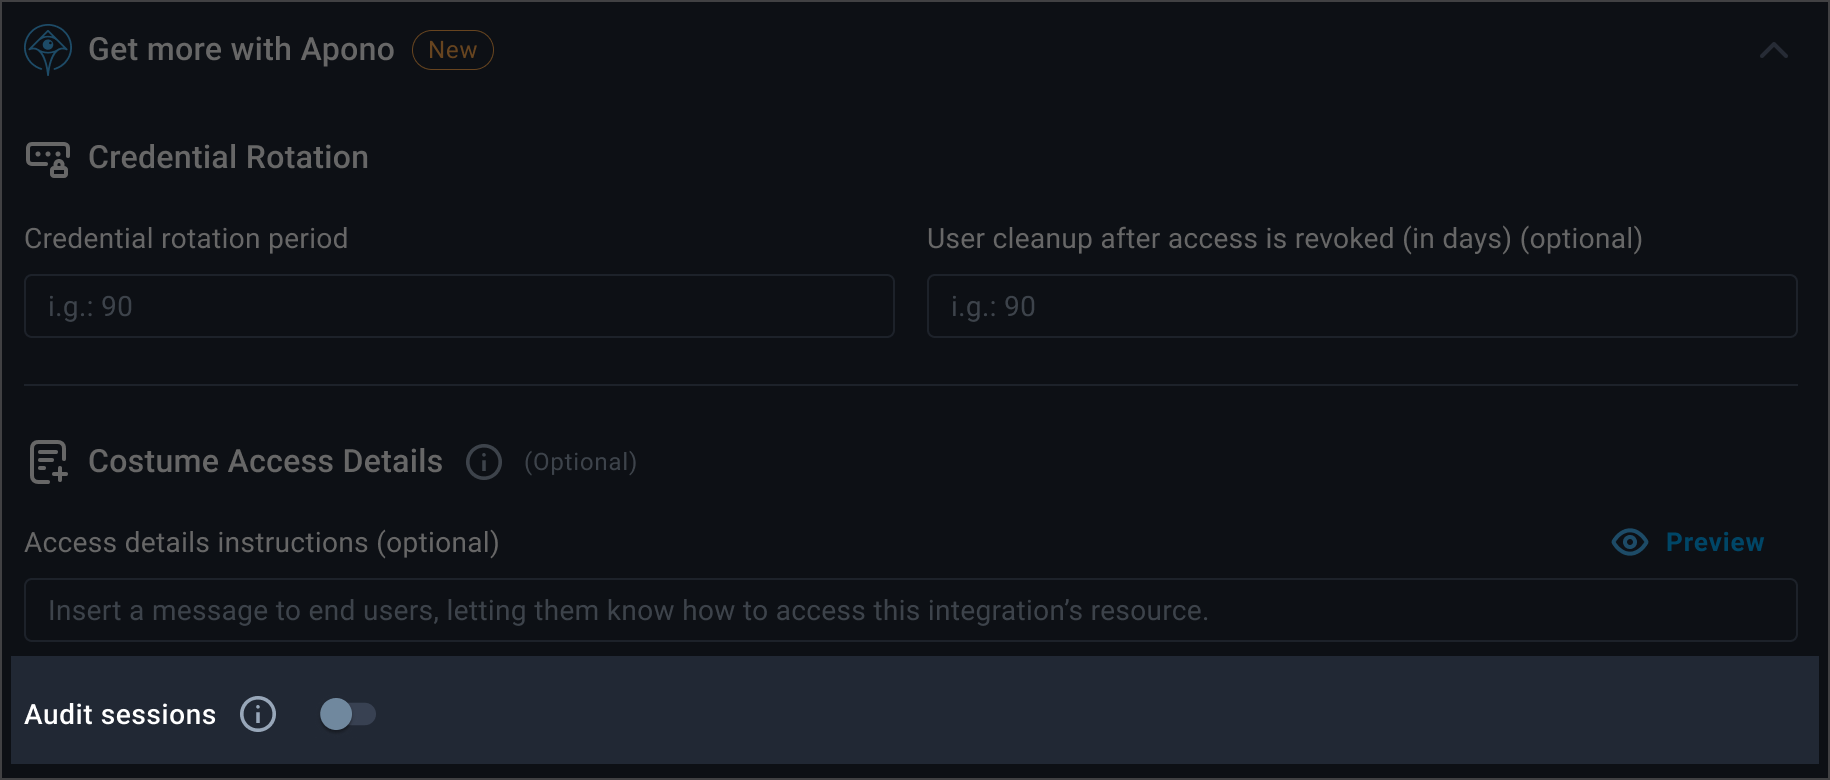
<figure><img src="/files/HUEwFlIGdRf9dwdbTUHv" alt="" width="563"><figcaption><p>Audit sessions toggle</p></figcaption></figure>

Follow these steps to enable Session Audit for the integration:

1. On the [**Connected**](https://app.apono.io/catalog/connected) tab, in the row of your SSH or Kubernetes integration, click **︙ > Edit**. The **Edit Integration** page appears.
2. Under **Get more with Apono**, toggle **Audit sessions** to **ON**. The toggle will appear green when enabled.


---

# Agent Instructions
This documentation is published with GitBook. GitBook is the documentation platform designed so that both humans and AI agents can read, navigate, and reason over technical content effectively. Learn more at gitbook.com.

## Querying This Documentation
If you need additional information that is not directly available in this page, you can query the documentation dynamically by asking a question.

Perform an HTTP GET request on the current page URL with the `ask` query parameter, and the optional `goal` query parameter:

```
GET https://docs.apono.io/docs/audits-and-reports/session-audit/session-audit-implementation.md?ask=<question>&goal=<endgoal>
```

`ask` is the immediate question: it should be specific, self-contained, and written in natural language.
`goal` is optional and describes the broader end goal you are ultimately trying to accomplish on behalf of the user. GitBook uses it to tailor the answer towards what is most useful for that goal.

The response will contain a direct answer to the question and relevant excerpts and sources from the documentation.

Use this mechanism when the answer is not explicitly present in the current page, you need clarification or additional context, or you want to retrieve related documentation sections.