Loading...
Loading...
Loading...
Loading...
Loading...
Loading...
Loading...
Loading...
Loading...
Manage just-in-time, just-enough access to servers, RDPs, internal apps, and more
Create an integration to manage access to an RDP server
Microsoft Remote Desktop Protocol (RDP) enables users to connect to and control a remote computer or virtual machine over a network. It provides secure and efficient remote access to desktops, servers, and applications, allowing employees to work from anywhere with an internet connection.
With this integration, Apono enables you to manage access to an RDP server with Connect permission or custom permissions group, so that only specific users or groups can provide remote access to resources in your environment on a temporary, as-needed basis.
Before you begin integrating RDP with Apono, you must configure the Windows Remote Management (WinRM) service on a Windows machine to allow remote access using unencrypted and basic authentication.
You can allow or communication.
Follow these steps to configure the RDP server:
Add the WinRM port 5985 to the allowlist in the server firewall.
Turn on the WinRM firewall rule in the Windows server.
Analyze and configure the WinRM service to allow remote management on the local machine.
WinRM HTTPS requires a local computer Server Authentication certificate with a CN matching the hostname to be installed. The certificate must not be expired, revoked, or self-signed.
You can also use the steps below to integrate with Apono using Terraform.
In step 11, instead of clicking Confirm, follow the Are you integrating with Apono using Terraform? guidance.
Follow these steps to complete the integration:
On the tab, click RDP The Connect Integration page appears.
Under Discovery, select one or multiple resource types for Apono to discover in all instances of the environment.
Click Next. The Apono connector section expands.
If the desired connector is not listed, click + Add new connector and follow the instructions for creating a connector (, , , ).
Click Next. The Integration Config page appears.
Define the Integration Config settings.
If you want to integrate with Apono using Terraform, follow these steps instead of clicking Confirm:
At the top of the screen, click View as Code. A modal appears with the completed Terraform configuration code.
Now that you have completed this integration, you can that grant permission to your RDP server.
If a confirmation prompt appears after running the following command, enter y.
Set the WinRM service configuration to allow unencrypted traffic.
Enable basic authentication for the WinRM service. Basic authentication transmits credentials in cleartext.Shell
You can now integrate an RDP server.
Follow these steps to configure the RDP server:
Add the WinRM port 5985 to the allowlist in the server firewall.
Turn on the WinRM firewall rule in the Windows server.
Analyze and configure the WinRM service to allow remote management on the local machine.
If a confirmation prompt appears after running the following command, enter y.
Enable basic authentication for the WinRM service. Basic authentication transmits credentials in cleartext.
Configure WinRM HTTPS access on the target machine.
Configuring WinRM to use HTTPS encrypts data transmitted between the client and server, protecting sensitive information from interception. To enable HTTPS, ensure a valid server authentication certificate is installed on the target machine.
You can now .
From the dropdown menu, select a connector.
DNS name or IP address of the RDP server to connect
WinRM Port
WinRM port value for the server By default, Apono sets this value to 5985.
RDP Port
(Optional) RDP port value By default, Apono sets this value to 3389.
Use SSL connection
Encrypted or unencrypted connection indicator Possible Values:
false: Unencrypted (unsecure) connection
true: Encrypted (secure) connection
Click Next. The Secret Store section expands.
Click Next. The Get more with Apono section expands.
Define the Get more with Apono settings.
Credential Rotation
(Optional) Number of days after which the database credentials must be rotated Learn more about the .
User cleanup after access is revoked (in days)
(Optional) Defines the number of days after access has been revoked that the user should be deleted
Learn more about .
Custom Access Details
(Optional) Instructions explaining how to access this integration's resources Upon accessing an integration, a message with these instructions will be displayed to end users in the User Portal. The message may include up to 400 characters. To view the message as it appears to end users, click Preview.
Integration Owner
Click Confirm.
Make any additional edits.
Deploy the code in your Terraform.
Refer to Integration Config Metadata for more details about the schema definition.
Apono Connector
User
Microsoft RDP user for Apono The RDP user must be one of the following:
Admin user
Custom role user with the following permissions:
GenericRead
ListChildren
CreateChild
DeleteChild
ListObject
WriteMember
ResetPassword
Delete
Secret
Value generated with the credentials of the user you create
Create your secret based on the connector you are using.
You can also input the user credentials directly.
Apono does not store credentials. The Apono Connector uses the secret to communicate with services in your environment and separate the Apono web app from the environment for maximal security.
Integration Name
Unique, alphanumeric, user-friendly name used to identify this integration when constructing an access flow
Host
winrm quickconfigwinrm set winrm/config/service @{AllowUnencrypted="true"}winrm set winrm/config/service/Auth @{Basic="true"}(Optional) Fallback approver if no resource owner is found Follow these steps to define one or several integration owners:
From the Attribute dropdown menu, select User or Group under the relevant identity provider (IdP) platform.
From the Value dropdown menu, select one or multiple users or groups.
NOTE: When Resource Owner is defined, an Integration Owner must be defined.
Resource Owner
(Optional) Group or role responsible for managing access approvals or rejections for the resource Follow these steps to define one or several resource owners:
Enter a Key name. This value is the name of the tag created in your cloud environment.
From the Attribute dropdown menu, select an attribute under the IdP platform to which the key name is associated. Apono will use the value associated with the key (tag) to identify the resource owner. When you update the membership of the group or role in your IdP platform, this change is also reflected in Apono.
NOTE: When this setting is defined, an Integration Owner must also be defined.
winrm quickconfigwinrm set winrm/config/service/Auth @{Basic="true"}How to integrate with your EC2 SSH Servers with Apono for JIT access
If users need to debug, develop or troubleshoot AWS EC2 SSH servers, they can request Just-in-Time access to them in Apono!
Admins can create Access Flows with specific EC2 SSH servers and build approval and access duration flows for different users, groups, and shifts.
Upon an approved request, Apono creates a certificate that grants access to the server and makes the requester a member of the group(s) representing the access they need. Apono may also use the user's default Linux group.
Installed Apono connector with network access to the AWS EC2 SSH Servers
Minimal Apono connector version: 1.4.0 (visit the and update the connector if needed)
A user with a key pair authentication for Apono to your SSH servers with sudo permissions. Add this line to the sudoers file:
What's a connector? What makes it so secure?
The Apono Connector is an on-prem connection that can be used to connect resources to Apono and separate the Apono web app from the environment for maximal .
Read more about the recommended .
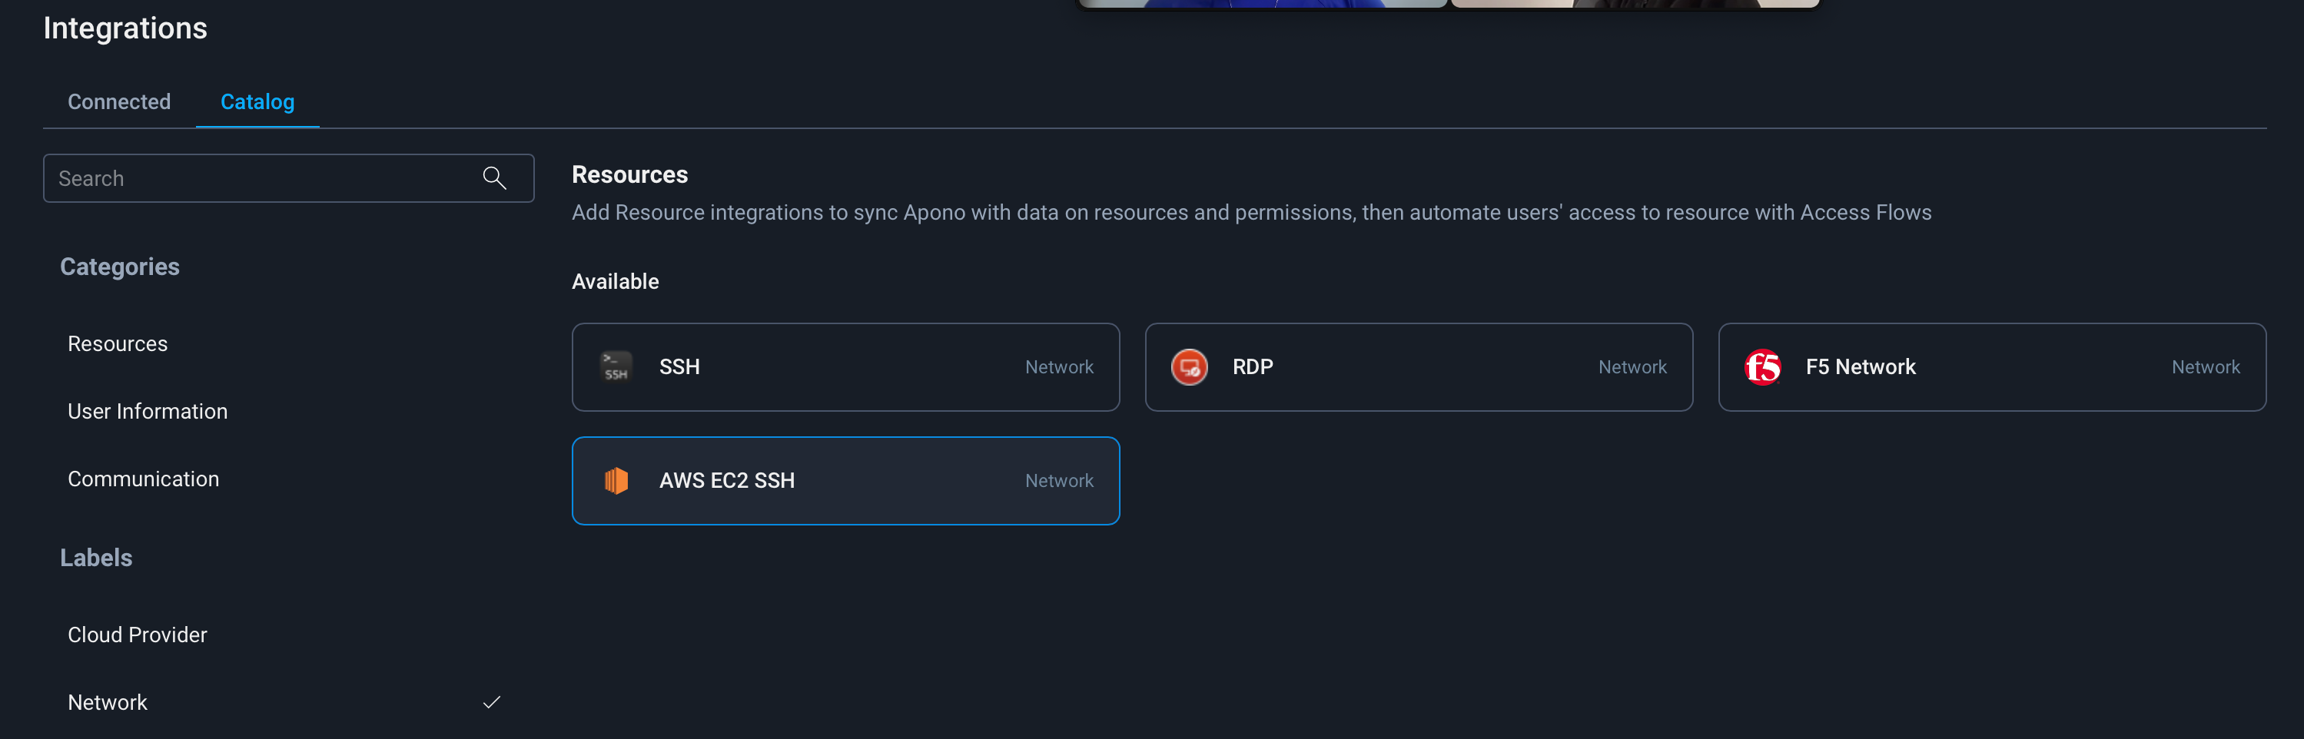
In the Apono app, navigate to the
Pick the AWS EC2 SSH integration:
Pick an existing connector or create a new one (see connector prerequisites)
Apono supports default access to SSH servers, even if no user groups were provided.
This means users can always log in with their default Linux group.
You will be redirected to the tab.
Make sure you see the AWS EC2 SSH integration as Active. The # of discovered SSH servers will appear in the table under Resources.
You can now create Access Flows for AWS EC2 SSH Servers!
How to integrate with your Azure VM SSH Servers with Apono for JIT access
If users need to debug, develop or troubleshoot Azure VM SSH servers, they can request Just-in-Time access to them in Apono!
Admins can create Access Flows with specific VM SSH servers and build approval and access duration flows for different users, groups, and shifts.
Upon an approved request, Apono creates a certificate that grants access to the server and makes the requester a member of the group(s) representing the access they need. Apono may also use the user's default Linux group.
Installed Apono connector with network access to the Azure VM SSH Servers
Minimal Apono connector version: 1.4.0 (visit the and update the connector if needed)
A user with a key pair authentication for Apono to your SSH servers with sudo permissions. Add this line to the sudoers file:
What's a connector? What makes it so secure?
The Apono Connector is an on-prem connection that can be used to connect resources to Apono and separate the Apono web app from the environment for maximal .
Read more about the recommended .
In the Apono app, navigate to the
Pick the Azure VM SSH integration:
Pick an existing connector or create a new one (see connector prerequisites)
Apono supports default access to SSH servers, even if no user groups were provided.
This means users can always log in with their default Linux group.
You will be redirected to the tab.
Make sure you see the Azure VM SSH integration as Active. The # of discovered SSH servers will appear in the table under Resources.
You can now create Access Flows for Azure VM SSH Servers!
Create an integration to manage access to SSH servers
SSH servers are secure, remote access points that allow users to connect to and manage systems over encrypted connections.
Through this integration, Apono enables managing secure Just-in-Time (JIT) access to SSH servers. Admins can create access flows for specific SSH servers and define approval processes and access durations for different users, groups, and shifts.
When a user's access request is approved, Apono creates a certificate that grants access to the server and assigns the requester to the appropriate access group(s). Apono may also use the user's default Linux group.
apono ALL=(ALL) NOPASSWD:ALL
Optional: User groups representing access to the servers. The default value is "Default", representing access to the server with the user's default Linux group.
In the secret store of your choice, create a secret for Apono with the following params:
Key: base64_private_key
Value: the SSH Server private key in base64 format (see SSH key prerequisites)
To find the private key in base64 format, run this command : cat /PATH-TO-KEY/key.pem | base64
Fill the config:
Integration name: Give the integration a name of your choice
User: set the name of the user you created in the prerequisites for the Apono connector.
User groups (Optional): The names of groups in the server representing the sudoer role (from a local server, puppet/chef, LDAP server, etc., depending on your network setup)
Secret: according to the Secret Store of your choice, insert the secret you created in step 4.
Region (Optional): Select a specific Azure region to integrate. If you pick nothing, all regions will be synced.
Apono Connector
On-prem connection serving as a bridge between an SSH server and Apono:
Apono Secret
Value generated with the credentials of the SSH server user
based on your SSH server private key in base64 format.
To find the private key in base64 format, run the following command.
Apono does not store credentials. The Apono connector uses the secret to communicate with services in your environment and separates the Apono web app from the environment for security.
User with Key Pair Authentication
Dedicated SSH server user account that authenticates with SSH key pairs
In the sudoers file, add the following line to allow Apono to execute commands with sudo privileges without a password prompt.
JSON List of Servers
Structured list of SSH servers to which Apono will connect
The following information should be provided for each server:
name: Unique identifier for the server
host: IP address or hostname of the server
User Groups
(Optional) User groups representing access to the SSH servers
Default: Default
The default represents access to the server with the user's default Linux group.
You can also use the steps below to integrate with Apono using Terraform.
In step 10, instead of clicking Confirm, follow the Are you integrating with Apono using Terraform? guidance.
Follow these steps to complete the integration:
On the Catalog tab, click SSH. The Connect Integration page appears.
Under Discovery, click Next. The Apono connector section expands.
From the dropdown menu, select a connector. Choosing a connector links Apono to all the services available on the account where the connector is located.
If the desired connector is not listed, click + Add new connector and follow the instructions for creating a connector (AWS, Azure, GCP, Kubernetes).
Click Next. The Integration Config page appears.
Define the Integration Config settings.
Integration Name
Unique, alphanumeric, user-friendly name used to identify this integration when constructing an access flow
Servers
Minified JSON list of servers
User Groups
(Optional) Names of groups in the server representing the sudoer role
User's Login Shell
(Optional) Command-line interface program used to log in to an account via SSH
User Key Name
(Optional) Filename of the SSH key pair used for authentication
Click Next. The Secret Store section expands.
Click Next. The Get more with Apono section expands.
Define the Get more with Apono settings.
Credential Rotation
(Optional) Number of days after which the database credentials must be rotated
Learn more about the .
User cleanup after access is revoked (in days)
(Optional) Defines the number of days after access has been revoked that the user should be deleted
Learn more about .
Custom Access Details
(Optional) Instructions explaining how to access this integration's resources Upon accessing an integration, a message with these instructions will be displayed to end users in the User Portal. The message may include up to 400 characters. To view the message as it appears to end users, click Preview.
Integration Owner
(Optional) Fallback approver if no is found Follow these steps to define one or several integration owners:
From the Attribute dropdown menu, select User or Group under the relevant identity provider (IdP) platform.
From the Value dropdown menu, select one or multiple users or groups.
NOTE: When Resource Owner is defined, an Integration Owner
Resource Owner
(Optional) Group or role responsible for managing access approvals or rejections for the resource Follow these steps to define one or several :
Enter a Key name. This value is the name of the tag created in your cloud environment.
From the Attribute dropdown menu, select an attribute under the IdP platform to which the key name is associated. Apono will use the value associated with the key (tag) to identify the resource owner. When you update the membership of the group or role in your IdP platform, this change is also reflected in Apono.
NOTE: When this setting is defined, an Integration Owner
Click Confirm.
If you want to integrate with Apono using Terraform, follow these steps instead of clicking Confirm:
At the top of the screen, click View as Code. A modal appears with the completed Terraform configuration code.
Click to copy the code.
Make any additional edits.
Deploy the code in your Terraform.
Refer to for more details about the schema definition.
Now that you have completed this integration, you can create access flows that grant permission to your SSH instance.
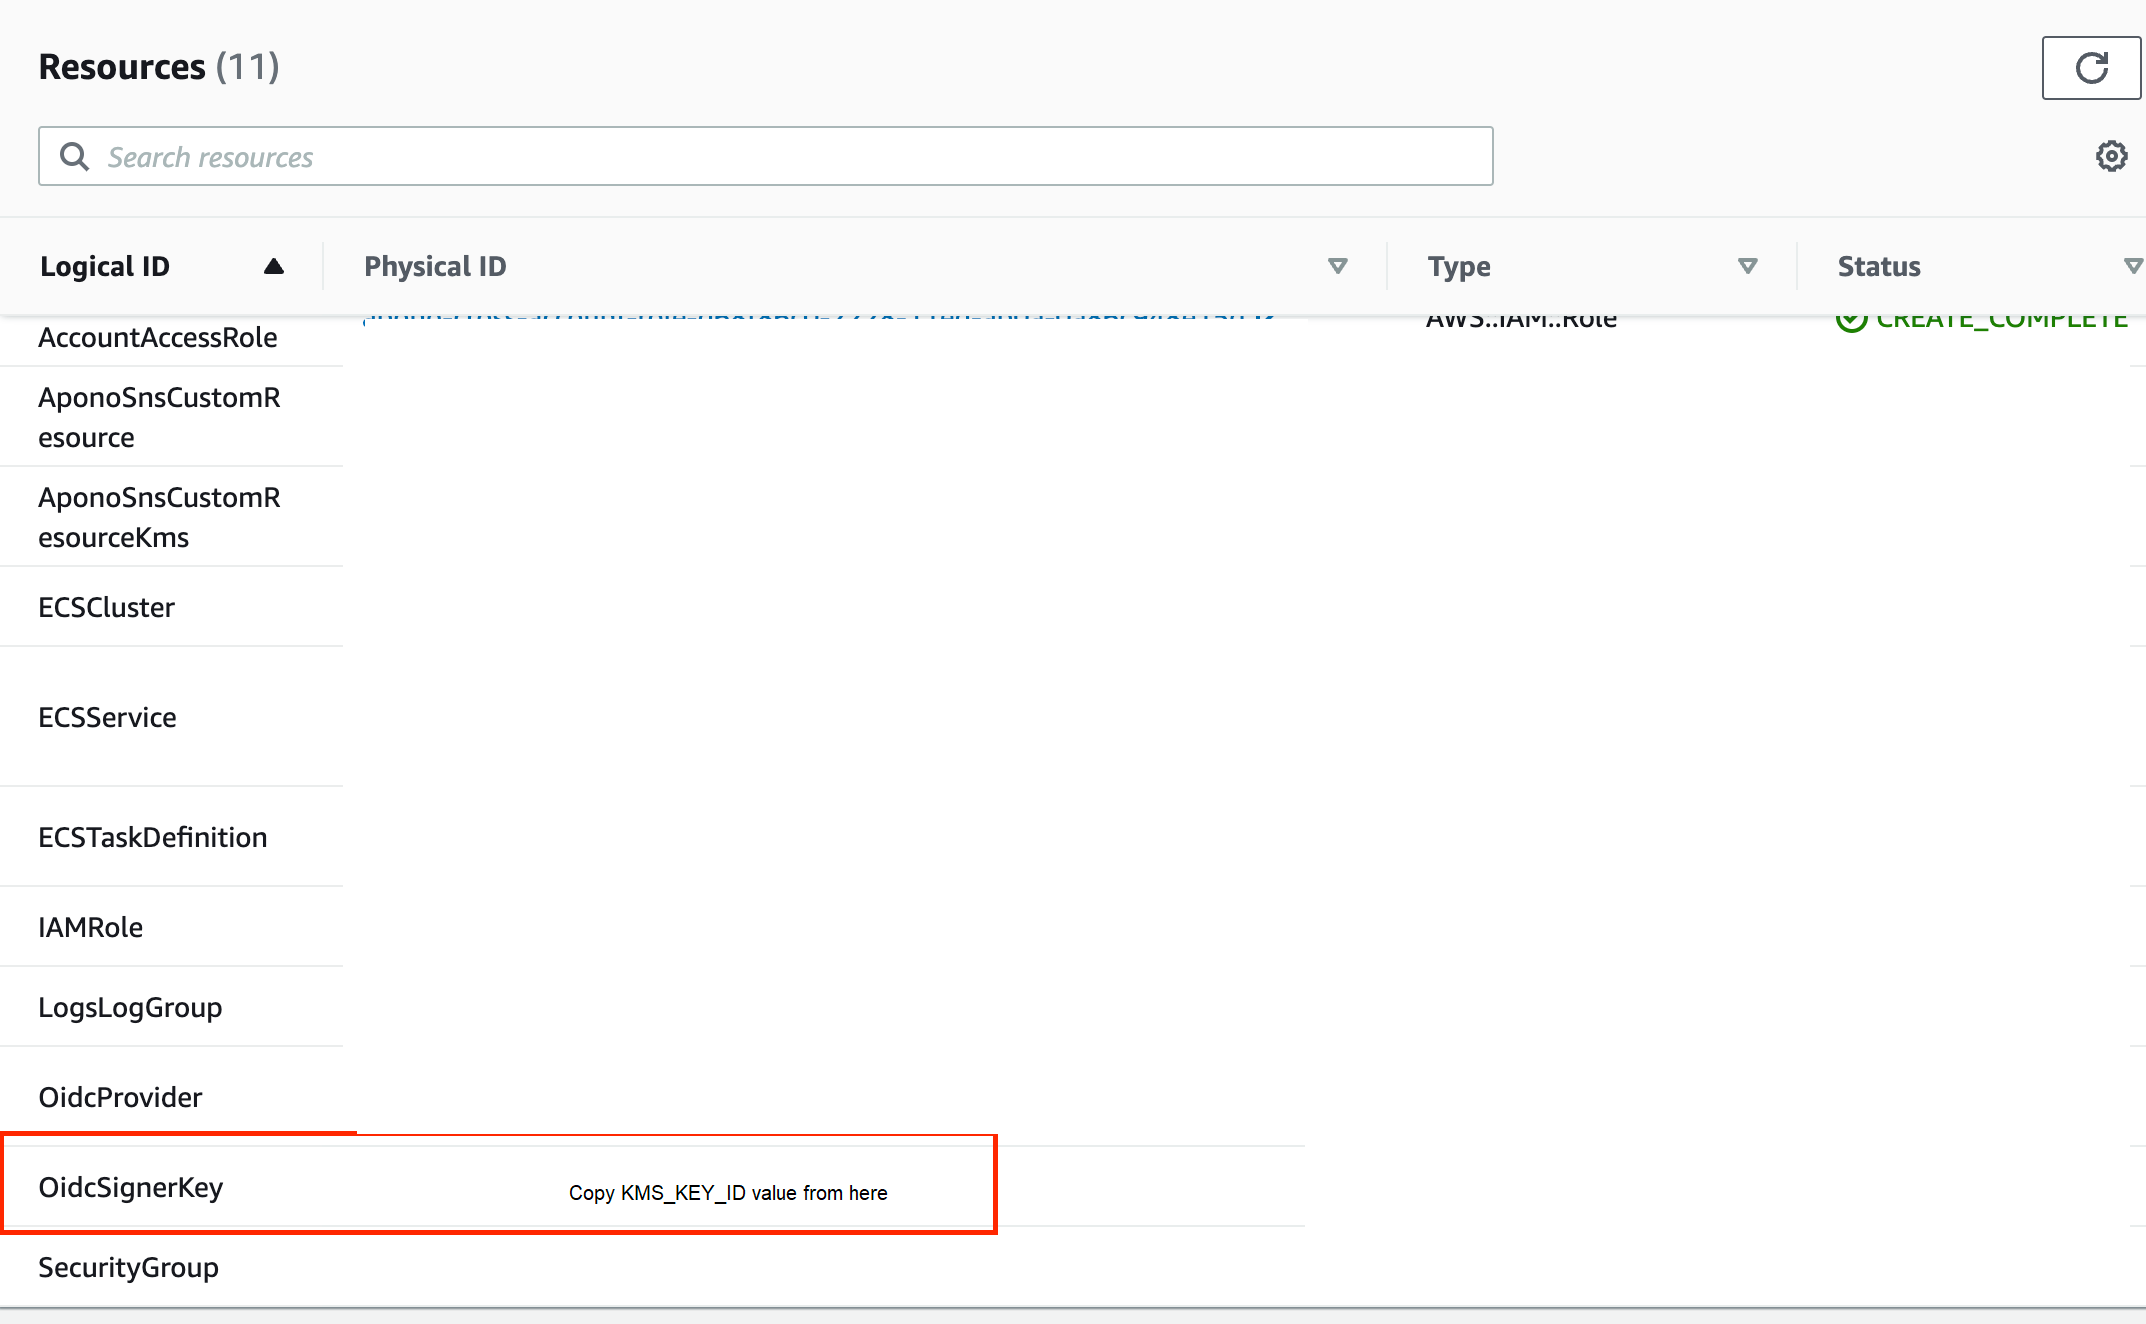
Set the following env vars:
KMS_KEY_ID value should be the OidcSignerKey created by Apono-Connector CloudFormation stack:
Install envoy proxy with helm:
K8S_NAMESPACE=
KMS_KEY_ID=helm install envoy-proxy https://apono-io.github.io/apono-helm-charts/envoy-proxy/envoy-1.0.4.tgz \
--namespace $K8S_NAMESPACE \
--set-string jwks=`aws kms get-public-key --key-id $KMS_KEY_ID --output text --query PublicKey | awk '{print "-----BEGIN PUBLIC KEY-----\n"$1"\n-----END PUBLIC KEY-----"}' | docker run -i danedmunds/pem-to-jwk:latest | awk '{print "{\"keys\":["$1"]}"}' | openssl base64 -A` \
--set-string tls=true \ # if destination is https
--set-string accessLogs=true \ # if you want access logs to be written
--create-namespaceMinimum Required Version: 1.4.0
Learn how to update an existing , , , or connector.
user: (Optional) Username for the SSH connection. Default: apono
port: (Optional) SSH port number. Default: 22
tags: (Optional) Labels for grouping server resources for .

"key": "base64_private_key"
"value": "<SSH_SERVER_PRIVATE_KEY>"cat /PATH-TO-KEY/key.pem | base64apono ALL=(ALL) NOPASSWD:ALL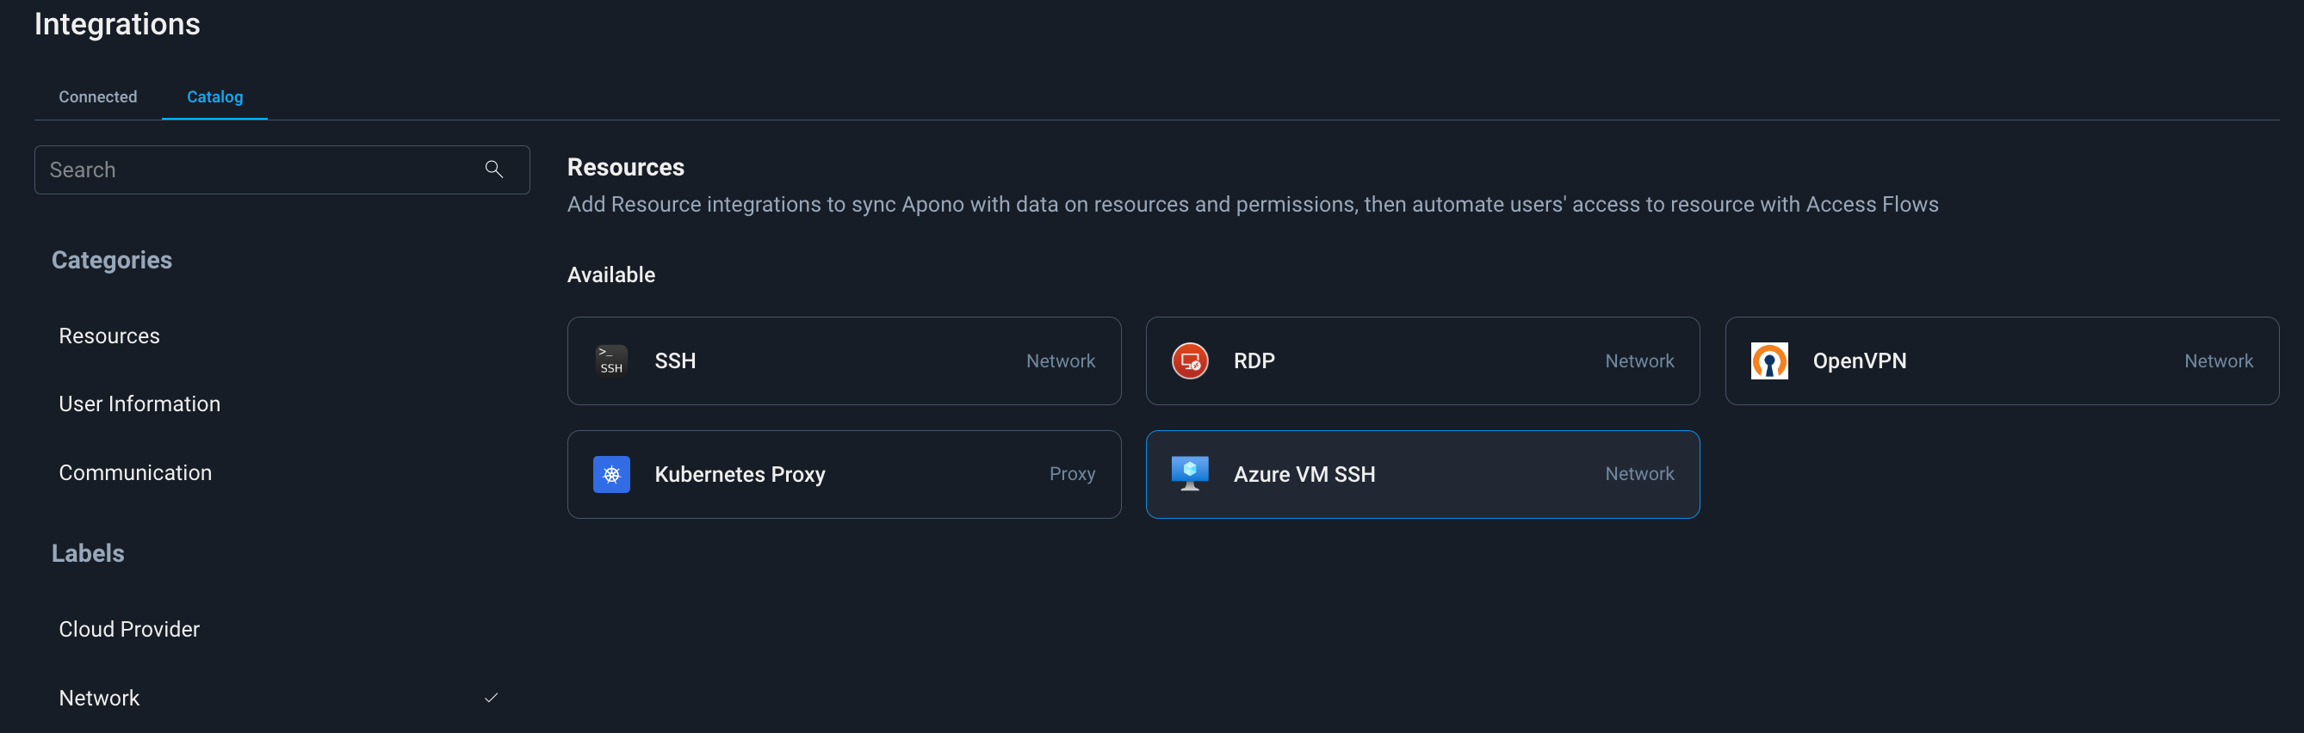
Create an integration to manage access to a Windows Domain Controller
A Windows Domain Controller (DC) authenticates and authorizes users, enforcing security policies for computers within the domain. Through centralized user management and access control, the DC ensures that users can log into computers and access resources like applications and files based on their permissions.
With this integration, Apono enables you to manage access to a Windows Domain Controller with Connect permission or a custom permissions group, so that only specific users or groups can provide remote access to resources in your environment on a temporary, as-needed basis.
Before you begin integrating Windows Domain Controller with Apono, you must allow remote access with the Windows Remote Management (WinRM) service on your Windows machine.
You can allow or communication.
Follow these steps to configure the Windows Domain Controller:
Add the WinRM port 5985 to the allowlist in the server firewall.
Turn on the WinRM firewall rule in the Windows server.
Analyze and configure the WinRM service to allow remote management on the local machine.
If a confirmation prompt appears after running the following command, enter y.
Set the WinRM service configuration to allow unencrypted traffic.
Enable basic authentication for the WinRM service. Basic authentication transmits credentials in cleartext.
You can now .
Follow these steps to configure the Windows Domain Controller:
Add the WinRM port 5985 to the allowlist in the server firewall.
Turn on the WinRM firewall rule in the Windows server.
Analyze and configure the WinRM service to allow remote management on the local machine.
If a confirmation prompt appears after running the following command, enter y.
Enable basic authentication for the WinRM service. Basic authentication transmits credentials in cleartext.Shell
Configure WinRM HTTPS access on the target machine.
Configuring WinRM to use HTTPS encrypts data transmitted between the client and server, protecting sensitive information from interception. To enable HTTPS, ensure a valid server authentication certificate is installed on the target machine.
You can now .
WinRM HTTPS requires a local computer Server Authentication certificate with a CN matching the hostname to be installed. The certificate must not be expired, revoked, or self-signed.
You can also use the steps below to integrate with Apono using Terraform.
In step 11, instead of clicking Confirm, follow the Are you integrating with Apono using Terraform? guidance.
Follow these steps to complete the integration:
On the tab, click Windows Domain Controller. The Connect Integration page appears.
Under Discovery, select one or multiple resource types for Apono to discover in all instances of the environment.
Click Next. The Apono connector section expands.
If the desired connector is not listed, click + Add new connector and follow the instructions for creating a connector (, , , ).
Click Next. The Integration Config page appears.
Define the Integration Config settings.
If you want to integrate with Apono using Terraform, follow these steps instead of clicking Confirm:
At the top of the screen, click View as Code. A modal appears with the completed Terraform configuration code.
Now that you have completed this integration, you can that grant permission to your Windows Domain Controller.
Create an integration to manage access to an F5 instance
F5 Network provides an application delivery and security platform that optimizes performance, ensures availability, and protects applications across on-premises and cloud environments.
Through this integration, Apono enables you to dynamically manage access to F5 resources by automating permissions and policies within your F5 Access Policy Manager (APM) instance.
Follow these steps to create a dedicated user for Apono:
In F5, with a user-friendly name, such as apono-connector.
Create a for the dedicated user to use during the Apono integration setup. Use the values from step 1 to generate the secret.
You can also input the user credentials directly into the Apono UI during the integration process.
You can now .
You can also use the steps below to integrate with Apono using Terraform.
In step 10, instead of clicking Confirm, follow the Are you integrating with Apono using Terraform? guidance.
Follow these steps to complete the integration:
On the tab, click F5 Network. The Connect Integration page appears.
Under Discovery, click Next. The Apono connector section expands.
From the dropdown menu, select a connector. Choosing a connector links Apono to all the services available on the account where the connector is located.
If the desired connector is not listed, click + Add new connector and follow the instructions for creating a connector (, , , ).
Click Next. The Integration Config section expands.
Define the Integration Config settings.
If you select the Apono secret manager, enter the following values:
Username: Enter the F5 Apono admin account username.
Password: Enter the F5 Apono admin account user password.
Click Next. The Get more with Apono section expands.
Define the Get more with Apono settings.
If you want to integrate with Apono using Terraform, follow these steps instead of clicking Confirm:
At the top of the screen, click View as Code. A modal appears with the completed Terraform configuration code.
Now that the integration is complete, you can use F5 Network to define the resources in an access flow. This allows requesters to access F5 Network resources securely based on your approval and provisioning rules.
Follow the guidance in these articles to define the resource using F5 Network:
Empower just-in-time group membership for Harmony SASE via Apono
Harmony Secure Access Service Edge (SASE) provides cloud-delivered network security, allowing organizations to streamline secure remote access with precision.
Integrating Harmony SASE with Apono allows you to automate just-in-time access by temporarily adding users to specific Harmony SASE groups. This ensures the right users get access only when needed and are automatically removed when access expires, which is ideal for short-term projects or incident response. This approach strengthens security, reduces operational overhead, and supports least-privilege access practices.
You can also use the steps below to integrate with Apono using Terraform.
In step 10, instead of clicking Confirm, follow the Are you integrating with Apono using Terraform? guidance.
Follow these steps to complete the integration:
On the tab, click Harmony. The Connect Integration page appears.
Under Discovery, click Next. The Apono connector section expands.
From the dropdown menu, select a connector. Choosing a connector links Apono to all the services available on the account where the connector is located.
If the desired connector is not listed, click + Add new connector and follow the instructions for creating a connector (, , , ).
Click Next. The Integration Config page appears.
Enter a unique, alphanumeric, user-friendly Integration Name to identify the integration when constructing an access flow.
From the dropdown menu, select a Region for the config’s activity.
If you select the Apono secret manager, enter the value of your .
Click Next. The Get more with Apono section expands.
Define the Get more with Apono settings.
Click Confirm.
If you want to integrate with Apono using Terraform, follow these steps instead of clicking Confirm:
At the top of the screen, click View as Code. A modal appears with the completed Terraform configuration code.
Now that the integration is complete, you can add Harmony SASE to define the grantees or resources in an access flow. This allows only the correct requesters to securely access your Harmony-synced groups, based on the access flow’s approval and provisioning rules.
Follow the guidance in these articles to define the resource using Harmony SASE.
From the dropdown menu, select a connector.
DNS name or IP address of the RDP server to connect
WinRM Port
WinRM port value for the server By default, Apono sets this value to 5985.
RDP Port
(Optional) RDP port value By default, Apono sets this value to 3389.
Use SSL connection
Encrypted or unencrypted connection indicator Possible Values:
false: Unencrypted (unsecure) connection
true: Encrypted (secure) connection
Click Next. The Secret Store section expands.
Click Next. The Get more with Apono section expands.
Define the Get more with Apono settings.
Credential Rotation
(Optional) Number of days after which the database credentials must be rotated Learn more about the .
User cleanup after access is revoked (in days)
(Optional) Defines the number of days after access has been revoked that the user should be deleted
Learn more about .
Custom Access Details
(Optional) Instructions explaining how to access this integration's resources Upon accessing an integration, a message with these instructions will be displayed to end users in the User Portal. The message may include up to 400 characters. To view the message as it appears to end users, click Preview.
Integration Owner
Click Confirm.
Make any additional edits.
Deploy the code in your Terraform.
Refer to Integration Config Metadata for more details about the schema definition.
Item
Description
Apono Connector
User
Windows Domain Controller user for Apono The Windows Domain Controller user must be one of the following:
Admin user
Custom role user with the following permissions:
GenericRead
ListChildren
CreateChild
DeleteChild
ListObject
WriteMember
ResetPassword
Delete
Secret
Value generated with the credentials of the user you create Create your secret based on the connector you are using.
Apono does not store credentials. The Apono Connector uses the secret to communicate with services in your environment and separates the Apono web app from the environment for maximal security.
Integration Name
Unique, alphanumeric, user-friendly name used to identify this integration when constructing an access flow
Host
Host and port of the F5 server hosting the Access Policy Manager (APM)
Access Profile Id
Identifier of the top-level access policy container that defines authentication and access logic
Resource Assign Id
Identifier of the rule set that represents the permission and assignment of webtop links to users
Webtop
Path to the Webtop object that presents assigned applications and links after user authentication
Webtop Sections (Optional)
Path used to group or organize webtop links within the Webtop resource
Click Next. The Secret Store section expands.
Integration Owner
(Optional) Fallback approver if no is found Follow these steps to define one or several integration owners:
From the Attribute dropdown menu, select User or Group under the relevant identity provider (IdP) platform.
From the Value dropdown menu, select one or multiple users or groups.
NOTE: When Resource Owner is defined, an Integration Owner
Resource Owner
(Optional) Group or role responsible for managing access approvals or rejections for the resource Follow these steps to define one or several :
Enter a Key name. This value is the name of the tag created in your cloud environment.
From the Attribute dropdown menu, select an attribute under the IdP platform to which the key name is associated. Apono will use the value associated with the key (tag) to identify the resource owner. When you update the membership of the group or role in your IdP platform, this change is also reflected in Apono.
NOTE: When this setting is defined, an
Click Confirm.
Make any additional edits.
Deploy the code in your Terraform.
Refer to Integration Config Metadata for more details about the schema definition.
F5 Admin Access
User account with admin permissions to create a new user account
F5 Network info
Information for integrating Apono and F5:
F5 Hostname
Access Profile Id
Resource Assign Id
Webtop path
(Optional) Webtop Sections path
Apono connector
Integration Name
Unique, alphanumeric, user-friendly name used to identify this integration when constructing an access flow
Custom Access Details
(Optional) Instructions explaining how to access this integration's resources Upon accessing an integration, a message with these instructions will be displayed to end users in the User Portal. The message may include up to 400 characters. To view the message as it appears to end users, click Preview.

F5 Hostname
Click Next. The Secret Store section expands.
Make any additional edits.
Deploy the code in your Terraform.
Refer to Integration Config Metadata for more details about the schema definition.
Harmony account access
Harmony SASE user account hosted by Perimeter 81 or Check Point
Apono connector
Harmony API key
Unique key generated in Harmony platform to authenticate connection with Apono Learn how to generate an API key with Harmony. NOTE: When creating the key, select all Key Permissions under the following categories for Apono to access your Harmony instance:
Members
Groups
Apono secret
Value generated with the credentials of the user you create
Create your secret based on your Redis Cloud API account key and user key:
"api_key": <ACCOUNT_KEY>
"secret_key": <USER_KEY>
Apono does not store credentials. The Apono Connector uses the secret to communicate with services in your environment and separate the Apono web app from the environment for maximal .
Custom Access Details
(Optional) Instructions explaining how to access this integration's resources Upon accessing an integration, a message with these instructions will be displayed to end users in the User Portal. The message may include up to 400 characters. To view the message as it appears to end users, click Preview.
Integration Owner
(Optional) Fallback approver if no resource owner is found Follow these steps to define one or several integration owners:
From the Attribute dropdown menu, select User or Group under the relevant identity provider (IdP) platform.
From the Value dropdown menu, select one or multiple users or groups.
NOTE: When Resource Owner is defined, an Integration Owner must be defined.
Resource Owner
(Optional) Group or role responsible for managing access approvals or rejections for the resource Follow these steps to define one or several resource owners:
Enter a Key name. This value is the name of the tag created in your cloud environment.
From the Attribute dropdown menu, select an attribute under the IdP platform to which the key name is associated. Apono will use the value associated with the key (tag) to identify the resource owner. When you update the membership of the group or role in your IdP platform, this change is also reflected in Apono.
NOTE: When this setting is defined, an Integration Owner must also be defined.
Self Serve
Automatic

winrm quickconfigwinrm set winrm/config/service @{AllowUnencrypted="true"}winrm set winrm/config/service/Auth @{Basic="true"}winrm quickconfigwinrm set winrm/config/service/Auth @{Basic="true"}"username": "F5_USERNAME",
"password": "F5_PASSWORD"(Optional) Fallback approver if no resource owner is found Follow these steps to define one or several integration owners:
From the Attribute dropdown menu, select User or Group under the relevant identity provider (IdP) platform.
From the Value dropdown menu, select one or multiple users or groups.
NOTE: When Resource Owner is defined, an Integration Owner must be defined.
Resource Owner
(Optional) Group or role responsible for managing access approvals or rejections for the resource Follow these steps to define one or several resource owners:
Enter a Key name. This value is the name of the tag created in your cloud environment.
From the Attribute dropdown menu, select an attribute under the IdP platform to which the key name is associated. Apono will use the value associated with the key (tag) to identify the resource owner. When you update the membership of the group or role in your IdP platform, this change is also reflected in Apono.
NOTE: When this setting is defined, an Integration Owner must also be defined.