Send logs to ServiceNow triggered by Apono Access events
ServiceNow is a cloud-based platform that provides IT service management (ITSM) and business process automation tools. It enables organizations to streamline and automate various workflows, such as IT operations, customer service, and HR.
Follow these steps to configure a ServiceNow webhook:
On the page, click Add Webhook. The Add Webhook page appears.
Click Request Webhook.
Enter a unique, alphanumeric, user-friendly Request Webhook Name for identifying this webhook.
Click the Status toggle to
The webhook URL must adhere to the following requirements:
Uses the HTTPS protocol
Does not specify any custom ports
In the Body Template field, construct a JSON body for the webhook payload.
Click View event's payload schema to reveal the payload schema and available data fields. You can also refer to the to read the descriptions of each data field.
Under Headers, use the following Key and Value to set the header. Be sure to replace <SERVICENOW_TOKEN> with the ServiceNow API token.
From the Triggers dropdown menu, select one or more of the following event triggers, which correspond to Apono access request statuses:
RequestCreated
RequestApproved
RequestExpired
(Optional) In the Timeout in seconds field, enter the duration in seconds to wait before marking the request as failed.
(Optional) Define Response Validators to verify that the response from the webhook meets specified criteria:
Click + Add. A row of settings appears.
For more information about the test, click View Invocation Data. A panel opens revealing the request, response, and other relevant details.
Should your test fail, view these tips to .
Click Save Webhook.
The new webhook appears in the Webhooks table. Active webhooks are preceded by a green dot. Inactive webhooks are preceded by a white dot.
Apono access request logs will be sent to ServiceNow based on the triggers you have selected.
Create Zendesk tickets using an Apono webhook
Zendesk is a customer service platform offering tools designed to improve customer engagement and support. It allows businesses to manage customer interactions across multiple channels, including email, social media, and chat.
Through this integration, you will configure an Apono webhook that creates new tickets in Zendesk when user access requests are created, approved, granted, and revoked, or when requests fail.
Follow these steps to configure an Apono webhook:
On the page, click Add Webhook. The Add Webhook page appears.
Click Request Webhook.
Enter a unique, alphanumeric, user-friendly Request Webhook Name for identifying this webhook.
Click the Status toggle to
The webhook URL must adhere to the following requirements:
Uses the HTTPS protocol
Does not specify any custom ports
In the Body Template field, construct a JSON body for the webhook payload.
Click View event's payload schema to reveal the payload schema and available data fields. You can also refer to the to read the descriptions of each data field.
Under Headers, use the following Key and Value to set the header. Be sure to replace <ZENDESK_TOKEN> with a .
From the Triggers dropdown menu, select RequestCreated.
Under Filters, define one or several filter from the listed dropdown menus.
(Optional) In the Timeout in seconds field, enter the duration in seconds to wait before marking the request as failed.
(Optional) Define Response Validators to verify that the response from the webhook meets specified criteria:
Click + Add. A row of settings appears.
For more information about the test, click View Invocation Data. A panel opens revealing the request, response, and other relevant details.
Should your test fail, view these tips to .
Click Save Webhook.
The new webhook appears in the Webhooks table. Active webhooks are preceded by a green dot. Inactive webhooks are preceded by a white dot.
Apono will send a call to Zendesk to create a new ticket when the RequestCreated event is triggered.
Apono outbound webhooks integrations with IT Service Management tools
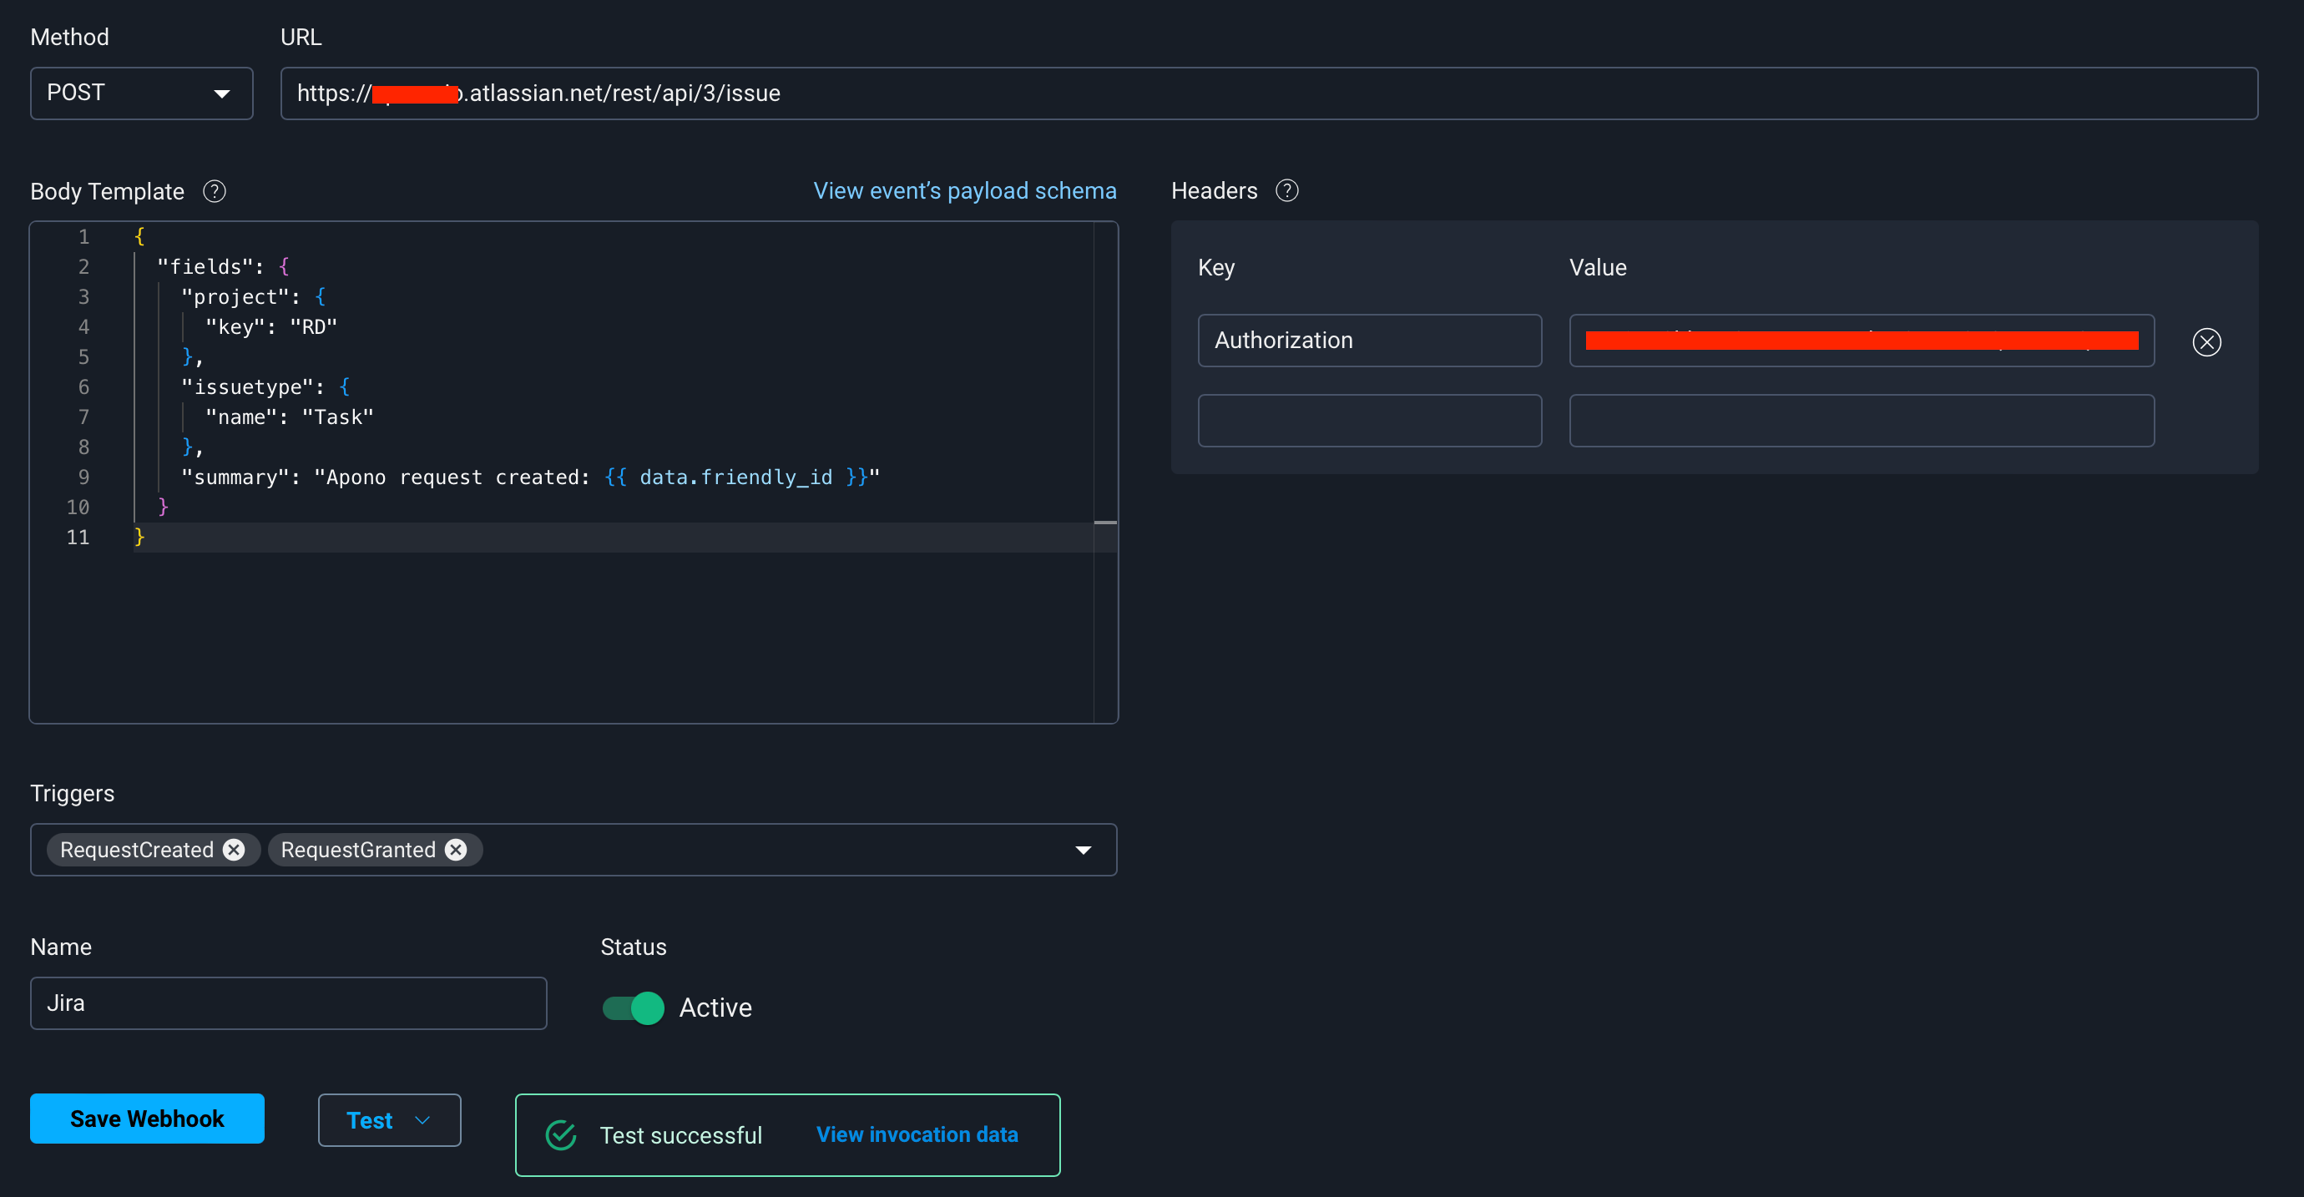
From the Method dropdown menu, select a REST method.
In the URL field, enter https://<SUBDOMAIN.zendesk.com/api/v2/tickets.
Be sure to replace <SUBDOMAIN> with the Zendesk subdomain for your account.
Open a ticket in Jira or ServiceNow for manually approved requests.
In the Expected Values field, enter a value and press the Enter key on your keyboard.
Repeat step c to add several expected values.
Repeat steps a-d to add multiple response validators.
Click Test to generate a test event to trigger your webhook. A Test successful or Test failed response status will appear at the bottom of the page. A successful test will send mock data to the target system.
Zendesk API Token
Authentication credential used when making requests to the Zendesk API Follow the steps to generate an API token:
Log in to Zendesk Admin Center.
Click Apps and Integrations > Zendesk API > Add API Token.
Zendesk API URL
Route for creating a ticket in your Zendesk instance
Example: https://<YOURDOMAIN>.zendesk.com/api/v2/tickets
Authorization
Bearer <ZENDESK_TOKEN>
{
"ticket": {
"comment": {
"body": "{ "event_type": "{{ event_type }}", "id": "{{ data.id }}", "friendly_id": "{{ data.friendly_id }}", "requester_id": "{{ data.requester.id }}", "requester_name": "{{ data.requester.name }}", "requester_email": "{{ data.requester.email }}", "justification": "{{ data.justification }}", "creation_date": "{{ data.creation_date }}", "access_flow_id": "{{ data.access_flow.id }}", "access_flow_name": "{{ data.access_flow.name }}", "access_bundle_id": "{{ data.access_bundle.id }}", "access_bundle_name": "{{ data.access_bundle.id }}", "access_groups_integration_name": "{{ data.access_groups.[0].integration.name }}", "access_groups_integration_type": "{{ data.access_groups.[0].integration.type }}" }"
},
"priority": "normal",
"description": "{{ data.justification }}",
"subject": "apono app - {{ event_type }} - {{ data.friendly_id }}"
}
}From the Method dropdown menu, select a REST method.
In the URL field, enter https://<SERVICENOW_INSTANCE_ID>.service-now.com/api/now/table/incident.
Be sure to replace <SERVICENOW_INSTANCE_ID> with the instance ID.
RequestFailed
RequestGranted
RequestRejected
Under Filters, define one or several filter from the listed dropdown menus.
Open a ticket in Jira or ServiceNow for manually approved requests.
In the Expected Values field, enter a value and press the Enter key on your keyboard.
Repeat step c to add several expected values.
Repeat steps a-d to add multiple response validators.
Click Test to generate a test event to trigger your webhook. A Test successful or Test failed response status will appear at the bottom of the page. A successful test will send mock data to the target system.
ServiceNow Account
Account with the Administrator role
ServiceNow Application Registration
Registration that enables Apono to use OAuth authorization
Be sure to copy the client_id and client_secret. You will use these values to generate the ServiceNow API token.
ServiceNow Information
Information for the ServiceNow instance:
Instance ID
Username
Password
Follow these steps to retrieve the ServiceName information:
On the , click your account icon > Manage instance password. The Manage instance password popup window appears.
Copy the Instance name, Username, and Password.
ServiceNow API token
Credential generated with a username and a password and used when making requests to the ServiceNow API.
Authorization
Bearer <SERVICENOW_TOKEN>
{
"caused_by": "{{ data.requester.name }}",
"short_description": "{{ data.access_groups.[0].integration.name }}",
"cause": "{{ event_type }}",
"description": "{ "event_type": "{{ event_type }}", "event_time": "{{ event_time }}", "id": "{{ data.id }}", "friendly_id": "{{ data.friendly_id }}", "requester_id": "{{ data.requester.id }}", "requester_name": "{{ data.requester.name }}", "requester_email": "{{ data.requester.email }}", "justification": "{{ data.justification }}", "creation_date": "{{ data.creation_date }}", "access_flow_id": "{{ data.access_flow.id }}", "access_flow_name": "{{ data.access_flow.name }}", "access_bundle_id": "{{ data.access_bundle.id }}", "access_bundle_name": "{{ data.access_bundle.id }}", "access_groups_integration_name": "{{ data.access_groups.[0].integration.name }}", "access_groups_integration_type": "{{ data.access_groups.[0].integration.type }}" }",
"reopened_by": "apono app"
}Create Freshdesk tickets using an Apono webhook
Freshdesk is a customer support platform that helps businesses efficiently manage and resolve customer inquiries and issues. It provides tools to streamline customer service processes across various channels, such as email, phone, chat, and social media.
Through this integration, you will configure an Apono webhook that creates new tickets in Freshdesk when user access requests are created, approved, granted, and revoked, or when requests fail.
Follow these steps to configure an Apono webhook:
On the page, click Add Webhook. The Add Webhook page appears.
Click Request Webhook.
Enter a unique, alphanumeric, user-friendly Request Webhook Name for identifying this webhook.
Click the Status toggle to
The webhook URL must adhere to the following requirements:
Uses the HTTPS protocol
Does not specify any custom ports
In the Body Template field, construct a JSON body for the webhook payload.
Click View event's payload schema to reveal the payload schema and available data fields. You can also refer to the to read the descriptions of each data field.
Under Headers, use the following Key and Value to set the header. Be sure to replace <FRESHDESK_TOKEN> with a ({ base64-encoding <api_token>:X}).
From the Triggers dropdown menu, select RequestCreated.
Under Filters, define one or several filter from the listed dropdown menus.
(Optional) In the Timeout in seconds field, enter the duration in seconds to wait before marking the request as failed.
(Optional) Define Response Validators to verify that the response from the webhook meets specified criteria:
Click + Add. A row of settings appears.
For more information about the test, click View Invocation Data. A panel opens revealing the request, response, and other relevant details.
Should your test fail, view these tips to .
Click Save Webhook.
The new webhook appears in the Webhooks table. Active webhooks are preceded by a green dot. Inactive webhooks are preceded by a white dot.
Apono will send a call to Freshdesk to create a new ticket when the RequestCreated event is triggered.
From the Method dropdown menu, select a REST method.
For the webhook URL, enter https://<SUBDOMAIN>.freshdesk.com/api/v2/tickets.
Be sure to replace <SUBDOMAIN> with the Freshdesk subdomain for your account.
Open a ticket in Jira or ServiceNow for manually approved requests.
In the Expected Values field, enter a value and press the Enter key on your keyboard.
Repeat step c to add several expected values.
Repeat steps a-d to add multiple response validators.
Click Test to generate a test event to trigger your webhook. A Test successful or Test failed response status will appear at the bottom of the page. A successful test will send mock data to the target system.
Freshdesk API Token
Authentication credential used when making requests to the Freshdesk API Follow the steps to generate an API token:
Log in to your Freshdesk account.
Click your profile picture > Profile settings
Click View API key.
Freshdesk API URL
Route for creating a ticket in your Freshdesk instance
Example: https://<SUBDOMAIN>.freshdesk.com/api/v2/tickets
Authorization
Basic <FRESHDESK_TOKEN>
{
"description": "{ "event_type": "{{ event_type }}", "event_time": "{{ event_time }}", "id": "{{ data.id }}", "friendly_id": "{{ data.friendly_id }}", "requester_id": "{{ data.requester.id }}", "requester_name": "{{ data.requester.name }}", "requester_email": "{{ data.requester.email }}", "justification": "{{ data.justification }}", "creation_date": "{{ data.creation_date }}", "access_flow_id": "{{ data.access_flow.id }}", "access_flow_name": "{{ data.access_flow.name }}", "access_bundle_id": "{{ data.access_bundle.id }}", "access_bundle_name": "{{ data.access_bundle.id }}", "access_groups_integration_name": "{{ data.access_groups.[0].integration.name }}", "access_groups_integration_type": "{{ data.access_groups.[0].integration.type }}" }",
"subject": "apono - {{ event_type }}",
"email": "{{ data.requester.email }}",
"priority": 1,
"status": 2
}Create an outgoing webhook in Apono that will allow to automatically create issues in Jira from Apono access requests
The steps below describe how to create an outgoing webhook in Apono that will allow to automatically create issues in Jira from Apono access requests.
You can automatically create and resolve issues in Jira via outgoing webhooks. This guide provides example webhook configurations for common use cases, as well as information on how to set up a user in Jira to be used by Apono.
A user in Jira to be used by Apono. You'll need the user's email address.
An for this user. These credentials will be used to communicate with Jira REST API.
Make sure the user has appropriate permissions to create and update issues in Jira.
Follow these steps to configure an Apono webhook:
On the page, click Add Webhook. The Add Webhook page appears.
Click Request Webhook.
Enter a unique, alphanumeric, user-friendly Request Webhook Name for identifying this webhook.
Click the Status toggle to
The webhook URL must adhere to the following requirements:
Uses the HTTPS protocol
Does not specify any custom ports
In the Body Template field, construct a JSON body for the webhook payload.
Click View event's payload schema to reveal the payload schema and available data fields. You can also refer to the to read the descriptions of each data field.
Under Headers, use the following Key and Value to set the headers required by the target system, such as an authorization header.
From the Triggers dropdown menu, select one or more of the following event triggers, which correspond to Apono access request statuses:
RequestCreated
RequestApproved
RequestExpired
(Optional) In the Timeout in seconds field, enter the duration in seconds to wait before marking the request as failed.
(Optional) Define Response Validators to verify that the response from the webhook meets specified criteria:
Click + Add. A row of settings appears.
For more information about the test, click View Invocation Data. A panel opens revealing the request, response, and other relevant details.
Should your test fail, view these tips to .
Click Save Webhook.
The new webhook appears in the Webhooks table. Active webhooks are preceded by a green dot. Inactive webhooks are preceded by a white dot.
Apono access request logs will be sent to Jira based on the triggers you have selected.
Your webhook should now start creating Jira tickets in the relevant project once triggered:
From the Method dropdown menu, select a REST method.
In the URL field, enter https://<DOMAIN>.atlassian.net/rest/api/3/issue.
Be sure to replace <DOMAIN> with your Jira domain.
RequestFailed
RequestGranted
RequestRejected
Under Filters, define one or several filter from the listed dropdown menus.
Open a ticket in Jira or ServiceNow for manually approved requests.
In the Expected Values field, enter a value and press the Enter key on your keyboard.
Repeat step c to add several expected values.
Repeat steps a-d to add multiple response validators.
Click Test to generate a test event to trigger your webhook. A Test successful or Test failed response status will appear at the bottom of the page. A successful test will send mock data to the target system.
Authorization
Basic <USERNAME:TOKEN>
The username is the user's email and token is the personal API token required in Prerequisites 1 and 2. <USERNAME:TOKEN> must be supplied in base64 encoding.
Create Freshservice tickets using an Apono webhook
Freshservice is an AI-powered, unified IT and employee service management solution that is simple to use and easy to scale. It provides the capabilities required for managing IT services and extends to non-IT teams as well.
Through this integration, you will configure an Apono webhook that creates new tickets in Freshservice when user access requests are created, approved, granted, and revoked, or when requests fail.
{
"fields": {
"project": {
"key": "<PROJECT_KEY>"
},
"issuetype": {
"name": "<ISSUE_TYPE_NAME>"
},
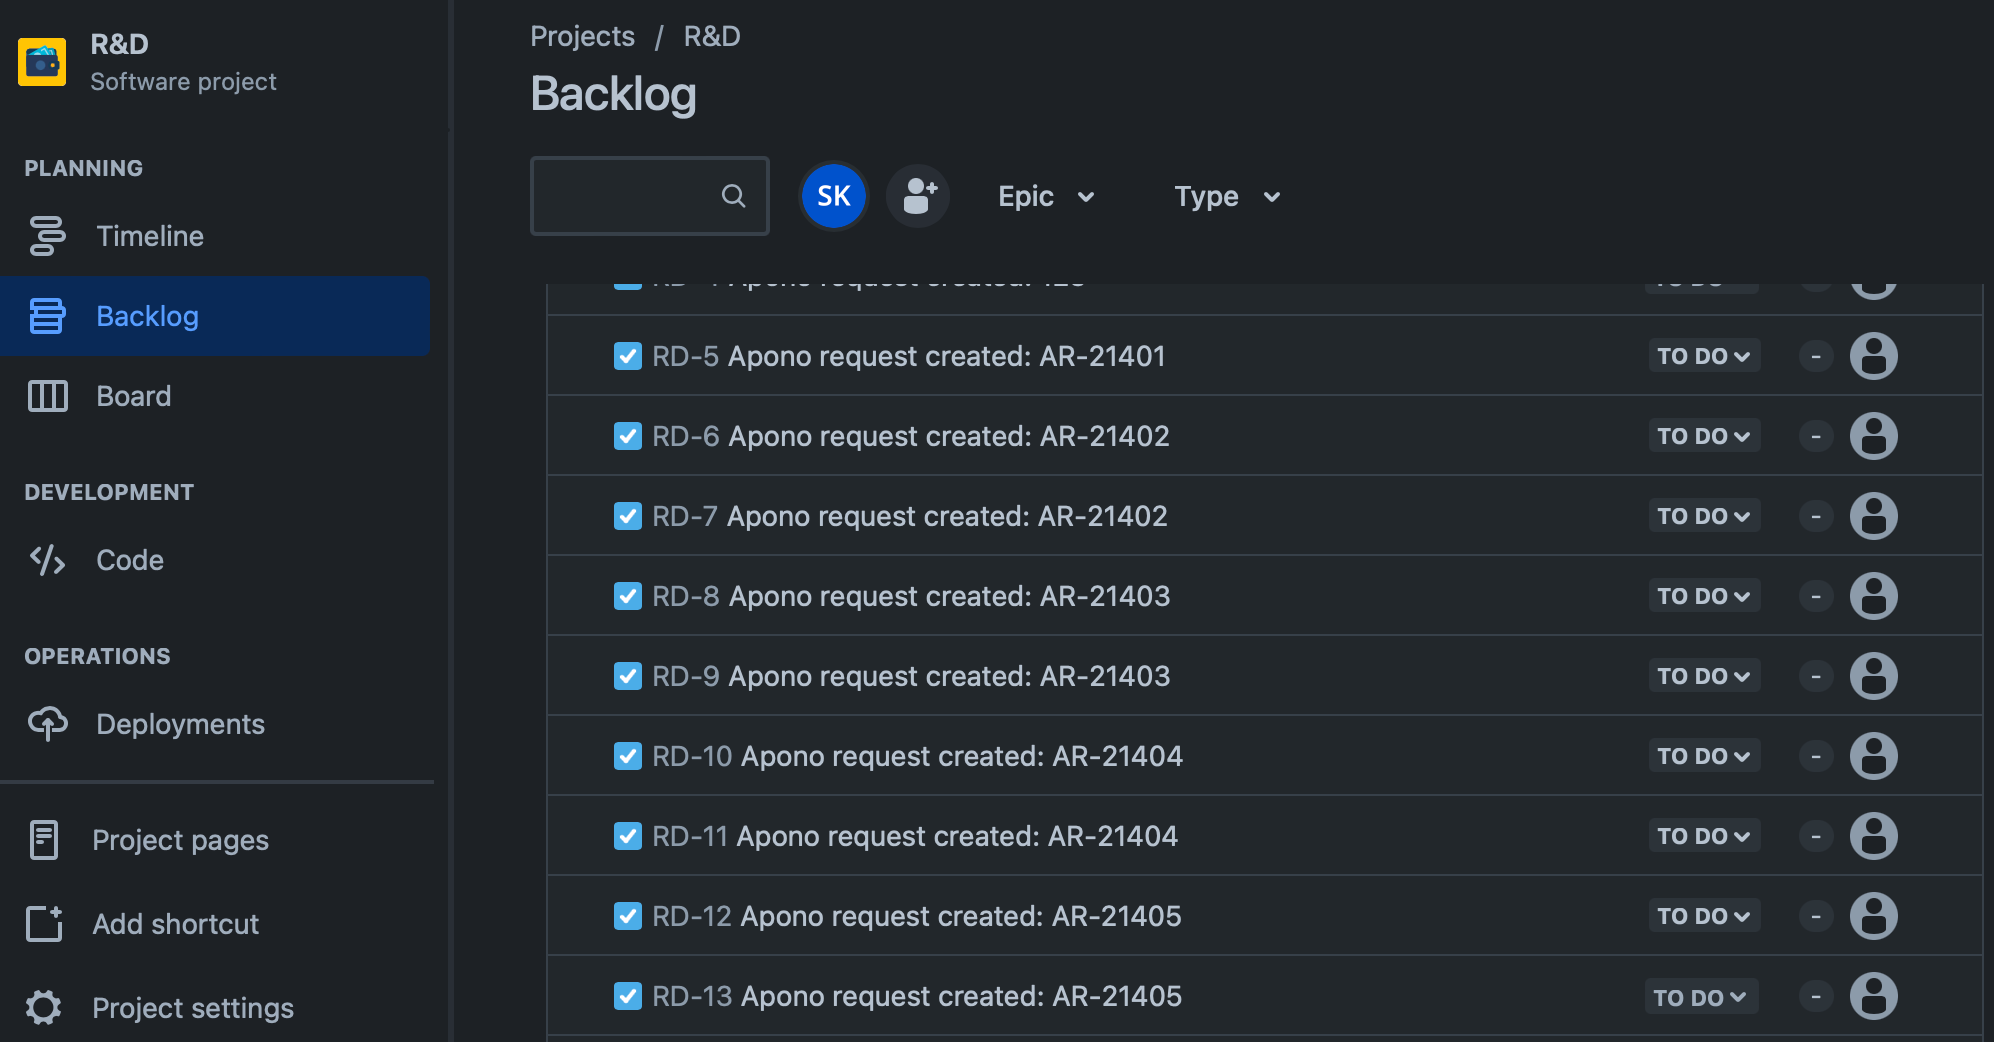
"summary": "Apono request created: {{ data.friendly_id }}"
}
}Follow these steps to configure a webhook:
On the Webhooks page, click Add Webhook. The Add Webhook page appears.
Click Request Webhook.
Enter a unique, alphanumeric, user-friendly Request Webhook Name for identifying this webhook.
Click the Status toggle to Active.
From the Method dropdown menu, select POST.
For the webhook URL, enter https://<DOMAIN>.freshdesk.com/api/v2/tickets.
The Body Template field expects a JSON structure as appears below. For the full JSON scheme for creating a ticket .
Click View event's payload schema to reveal the payload schema and available data fields. You can also refer to the Webhook Payload Schema Reference to read the descriptions of each data field.
For Headers, use the following Key and Value to set the authorization.
Authorization
Basic <BASE-64-API-KEY>
From the Triggers dropdown menu, select RequestCreated.
Under Filters, define one or several filter from the listed dropdown menus.
(Optional) In the Timeout in seconds field, enter the duration in seconds to wait before marking the request as failed.
(Optional) Define Response Validators to verify that the response from the webhook meets specified criteria:
Click + Add. A row of settings appears.
Starting with $.data., enter the Json Path of the JSON parameter.
In the Expected Values field, enter a value and press the Enter key on your keyboard.
Repeat step c to add several expected values.
Repeat steps a-d to add multiple response validators.
Click Test to generate a test event to trigger your webhook. A Test successful or Test failed response status will appear at the bottom of the page. A successful test will send mock data to the target system.
For more information about the test, click View Invocation Data. A panel opens revealing the request, response, and other relevant details.
Should your test fail, view these tips to troubleshoot your webhook.
Click Save Webhook.
The new webhook appears in the Webhooks table. Active webhooks are preceded by a green dot. Inactive webhooks are preceded by a white dot.
Apono will send a call to Freshservice to create a new ticket when the RequestCreated event is triggered.
Your webhook should now start Freshservice ticket once triggered:


{
"email": "{{data.requester.email}}",
"subject": "New {{event_type}} made by {{data.requester.name}}",
"description": "New {{event_type}} made by {{data.requester.name}}",
"priority": 1,
"status": 2
}

Create ServiceDesk Plus request using an Apono webhook
ServiceDesk Plus is ManageEngine's flagship IT and enterprise service management platform that helps modern enterprises design and deliver critical IT and business services.
Through this integration, you will configure an Apono webhook that creates new request in ServiceDesk Plus when user access requests are created, approved, granted, and revoked, or when requests fail.
and copy the API key to use it later
Follow these steps to configure a webhook:
On the page, click Add Webhook. The Add Webhook page appears.
Click Request Webhook.
Enter a unique, alphanumeric, user-friendly Request Webhook Name for identifying this webhook.
Click the Status toggle to
Click View event's payload schema to reveal the payload schema and available data fields. You can also refer to the to read the descriptions of each data field.
For Headers, use the following Key and Value to set the authorization.
From the Triggers dropdown menu, select one or more of the following event triggers, which correspond to Apono access request statuses:
RequestCreated
RequestApproved
RequestExpired
(Optional) In the Timeout in seconds field, enter the duration in seconds to wait before marking the request as failed.
(Optional) Define Response Validators to verify that the response from the webhook meets specified criteria:
Click + Add. A row of settings appears.
For more information about the test, click View Invocation Data. A panel opens revealing the request, response, and other relevant details.
Should your test fail, view these tips to .
Click Save Webhook.
The new webhook appears in the Webhooks table. Active webhooks are preceded by a green dot. Inactive webhooks are preceded by a white dot.
Apono access request will be created on ServiceDesk Plus based on the triggers you have selected.
From the Method dropdown menu, select POST.
For the webhook URL, enter http://<SERVER-NAME>:<PORT>/api/v3/requests
The Body Template field expects a JSON structure as appears below. For the full JSON scheme for creating a ticket SEE HERE.
RequestFailed
RequestGranted
RequestRejected
Under Filters, define one or several filter from the listed dropdown menus.
Open a ticket in Jira or ServiceNow for manually approved requests.
In the Expected Values field, enter a value and press the Enter key on your keyboard.
Repeat step c to add several expected values.
Repeat steps a-d to add multiple response validators.
Click Test to generate a test event to trigger your webhook. A Test successful or Test failed response status will appear at the bottom of the page. A successful test will send mock data to the target system.
Authorization
authtoken <API-KEY>
{
"request": {
"subject": "New {{event_type}} request",
"description": "New {{event_type}} request made by {{data.requester.name}}",
"requester": {
"id": "{{data.requester.id}}",
"name": "{{data.requester.name}}"
},
"impact_details": "{{event_type}} request",
"status": {
"name": "Open"
}
}
}